The last week involved a lot of work on bug fixes and getting ready for the festival, the final presentation and the final playthrough. Our instructor Mike worked with us to find hidden bugs which was very helpful in ensuring that our application ran smoothly.
We also began work on moving all of our documentation to a website where it can be accessed easily. We took inspiration from the format of Isetta Engine, a student pitched project that had worked to build a game engine from scratch. Here’s the link to our documentation website:
Here we have the content based on the various components that went into making the project successful.
The festival was on Saturday (12-Dec-20). It went much better for us than expected. Programmers found our project especially interesting and stayed in the booth for a long time to chat with us and share their feedback about what they think about this entire project.
Lastly, we also worked on the project trailer this week which can be found below:
Looking back we were very happy about how the project turned out. During the initial weeks of the project we were very considered about whether the AI would ever work or not. We were even preparing about potential directions we could head to if the AI did not end up working. Thankfully, it worked very well by the end.
We also got a chance to speak to MegaCrit (studio that developed Slay the Spire). It validated our idea and gave us confidence that the foundation of our project was strong. Going forward we think that AI is the future technology and it has a lot of potential to make a big impact in how games are developed.
We sincerely hope that our work will be useful for others who are looking to venture in a similar space.
This week started off with the softs opening on Monday which was received well. We handed out our playable prototype to the faculty but because of the lengthy nature of the entire process of using our app, no one really playtested the application. However, we were able to show a demo of our app to the faculty and that was much appreciated.
The remainder of the week involved locating and fixing bugs since most of the application is now complete. We made a bug list to go through it methodically and fix parts of the applications that were not functioning as expected. This was accompanied with the team coming together and playtesting the entire process again and again in order to ensure that it worked smoothly. The Unity playable demo was the one with some issues that was worked upon and tested heavily through the course of this week.
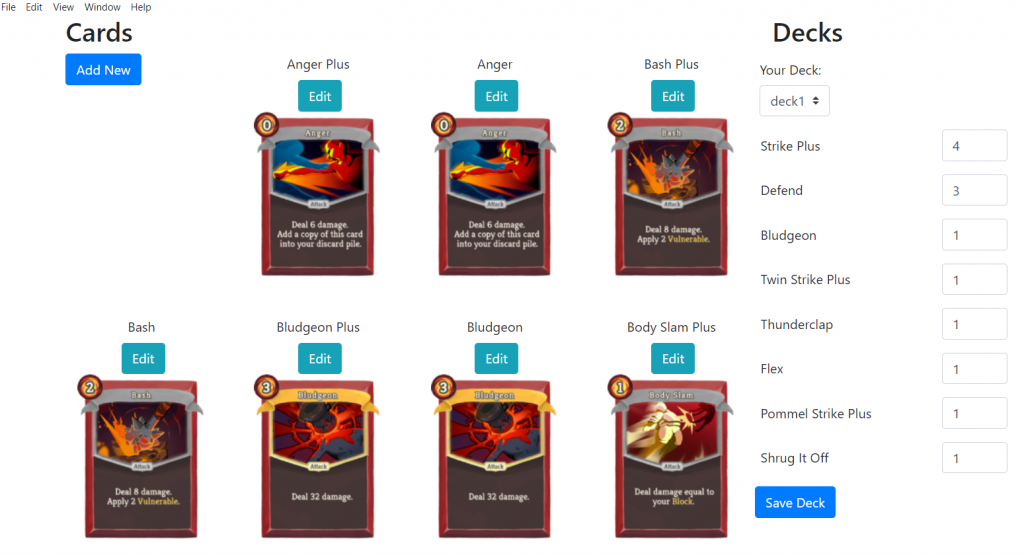
List of Bug Fixes
Here is an exhaustive list of all the bugs that were identified and fixed this week:
Unity app crashed randomly in the electron build.
Unity app’s ‘Replay’ button did not work as intended.
Unity app crashed when the deck had less than 5 cards.
In the electron application, selecting multiple copies of the same card to add to the deck would actually add only one copy
Issues when multiple Unity instances are launched at the same time
Both boss and player will got additional block on being attacked if they started with a greater than zero block value
Player got additional block when attacking the boss with an active Thorn buff
Heavy Blade did not get the full multiplier effect from the strength buff
Additional Small Features Added
Here is a list of some of the pending features that we added this week:
Anomalies Visualization
We added a long pending section in the data visualization part of our app called ‘Anomalies’. This will now allows you to see the game history of some of the anomalies encountered during playtesting: shortest win, longest win and maximum damage in a single turn. Below is a screenshot of how this looks:
Minor Improvements in User Experience
In order to improve the user experience, there were some features added to the electron app:
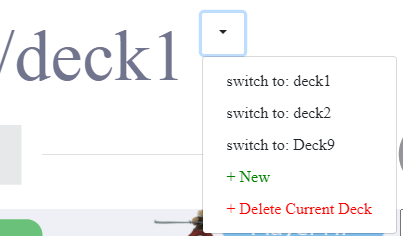
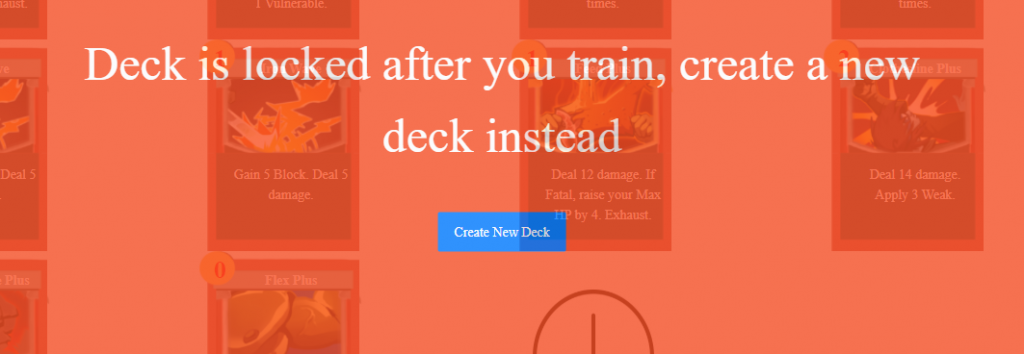
Decks can now be deleted using the delete deck button
Add Deck shortcut when the deck is locked
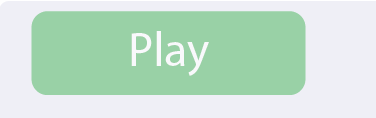
Play button is now disabled if you have a current Unity executable running
Apart from these changes, we also began work on the documentation of our work since this is an important part of our grading for the semester. What we set out to achieve was to give a blueprint to others who may want to do something similar using AI Playtesting. Going into our final week, we shall be preparing for the final presentation, the festival and our final documentation.
This week involved more polishing of our app in order to prepare for softs. We identified several bugs through the course of last which needed to be ironed out. We also added some minor features aimed at improving user experience. Last but not the least, we also worked towards creating a couple of videos explaining the objective of our project and showing a demo of our application. The videos will be posted on this page towards the end of this blog post.
New Features
The following are some of the new features we added this week :
Editing Game Attributes
Along with deck/card editing, we also want to allow designers to modify other parameters to change the game’s rules. As a part of the basic mode, designers can now modify the player hp and boss hp.
Details of how this is implemented are as follows:
Read value from database to show the current values
Highlight the value if user changes it
Show “Save” and “Undo” button if user changes the value
When“Save” is clicked, modify the value in the database and refresh the page
When “Undo” is clicked, recover the previous value, and remove the highlight
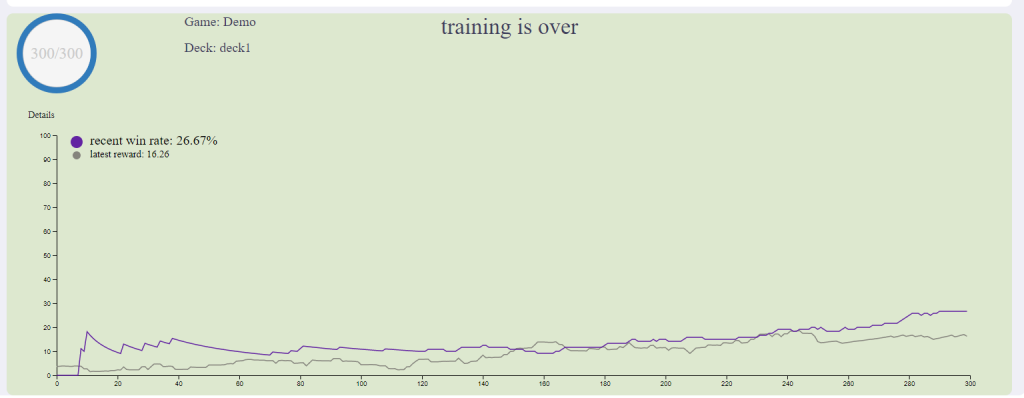
Win Rate Tracking (Train Step)
In order to let users know what’s going on during training, we decided to display a dynamically changing win rate curve on the dashboard.
Details of how this is implemented are as follows:
Calculate win rate in the python backend and send it to electron during training
Add visualization code to show two curves with different color in one graph
Maintain the historical win rate and draw the curve dynamically
Show latest win rate value with numbers on the graph
User Experience Improvement
Following are some of the user experience improvements we made this week:
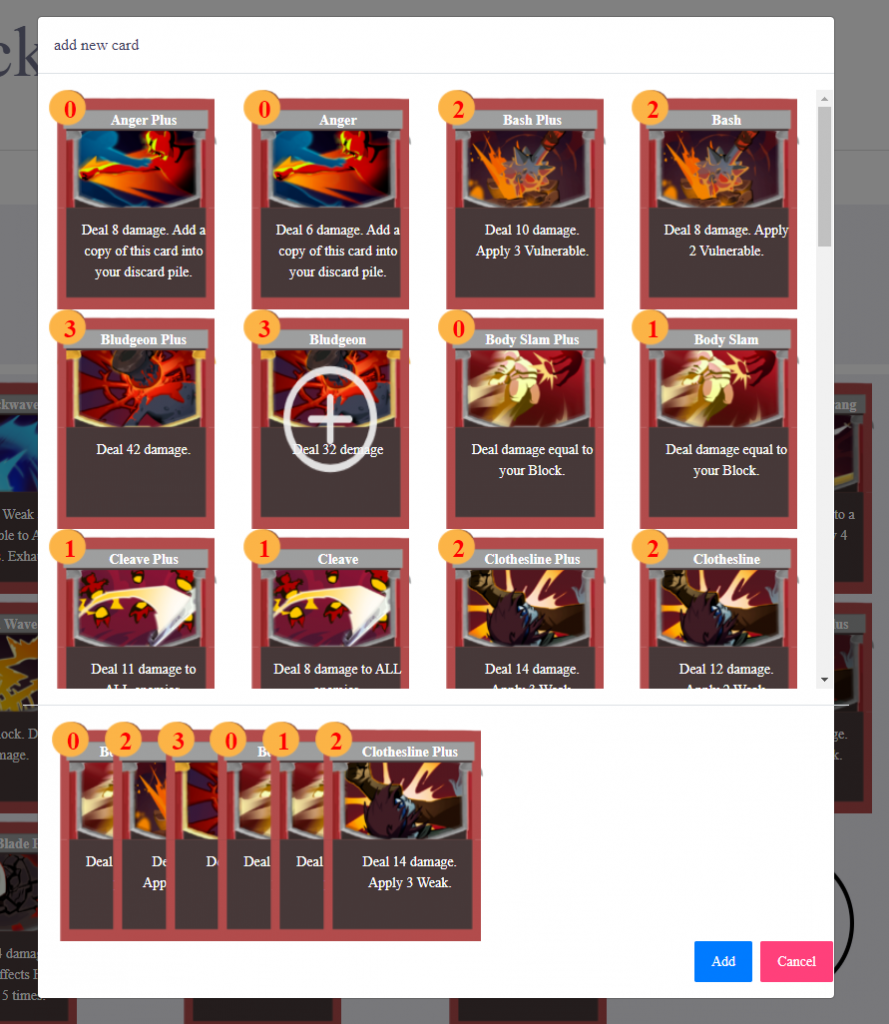
Implementation of a new UI for adding a card to a deck
Here’s an image of how card adding looks after the update:
Here’s how it works:
All available cards are listed in a grid display
Displays “Add” icon during mouse hover
Add cards to a temporary list when clicked
Display all current selected cards to add
When the “Add” button is clicked, add the selected cards to deck
General UI Polishing
Here are some UI changes we made this week. Screenshots of these changes are shown in this section.
Reorganization of the hierarchy in the data visualization section
Make game settings and deck switching more accessible
Change in UI styles,layout, font size to make information appears cleaner and easy to read
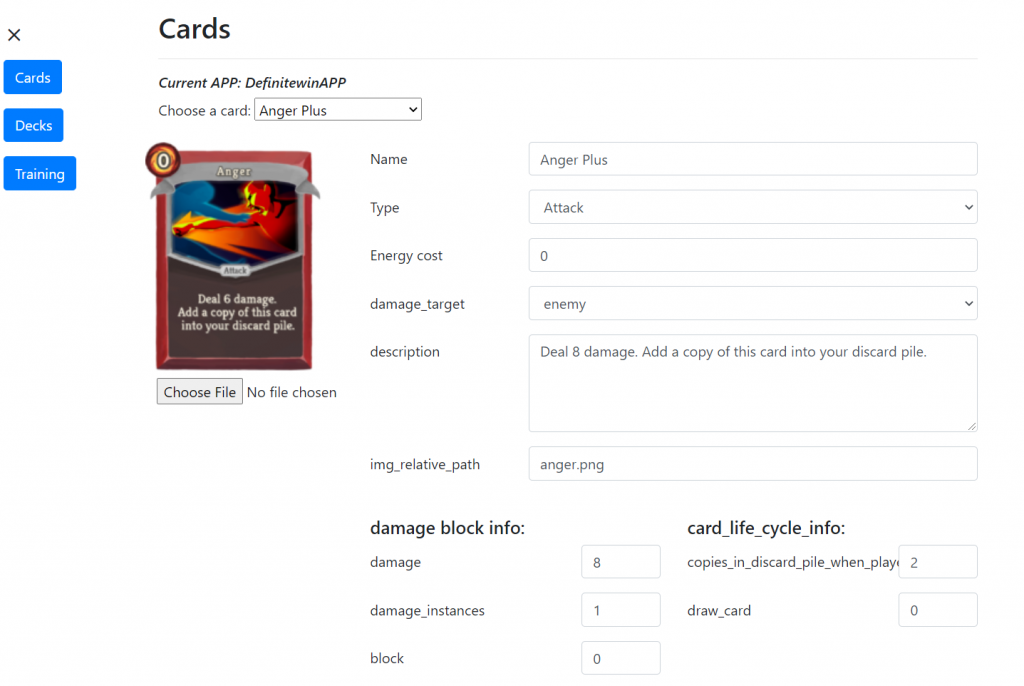
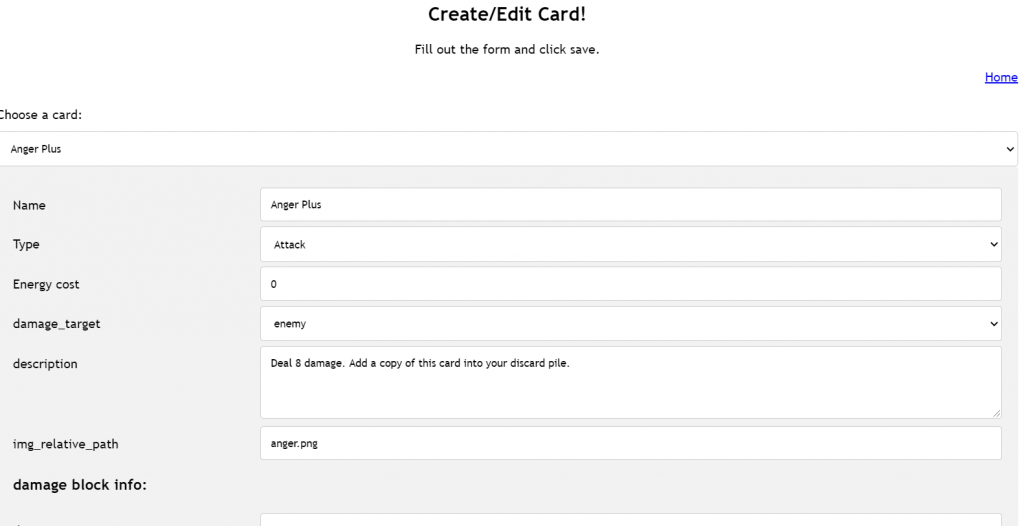
Polishing the Create/Edit Card Section (Advanced Mode)
Following are some changes that we made to the create/edit card section:
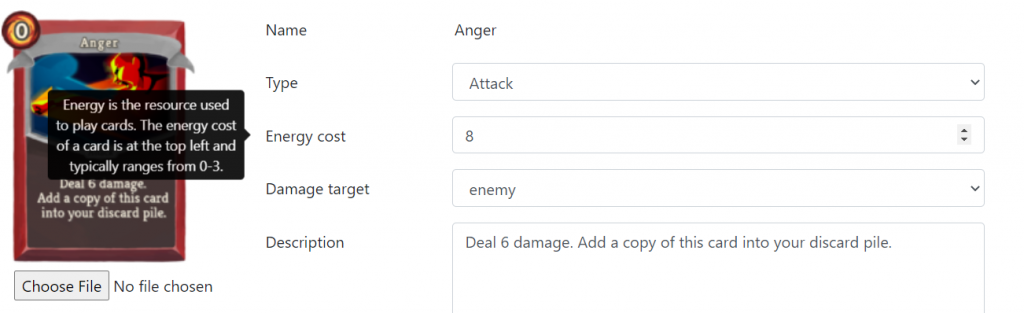
Tooltips
There are more than 15 configuration options available for designers to tweak in the create/edit card page. There are 5 input fields in the main area, and 3 input fields in each of “damage block info”, “card life cycle info”, and “special modifiers info” area.
We decided to provide tooltips when users hover over input labels so that users can know the definition of each input field. We referenced our tooltip information from Slay the Spire wiki. For example, the definition of energy cost is “Energy is the resource used to play cards. The energy cost of a card is at the top left and typically ranges from 0-3.” Also, for the buff info, we gave a link to the Slay the Spire wiki to reference all the buff information.
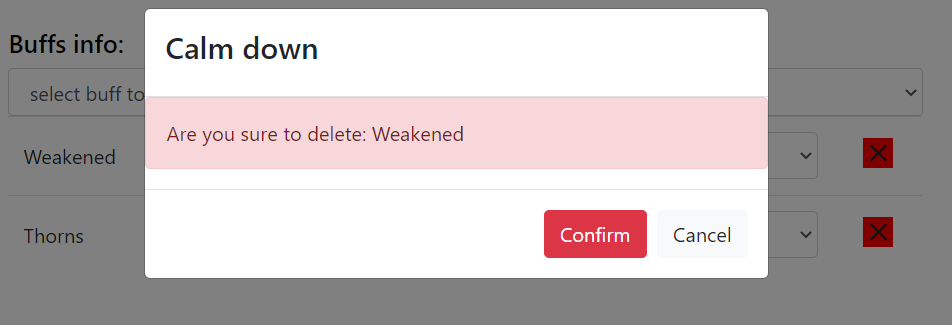
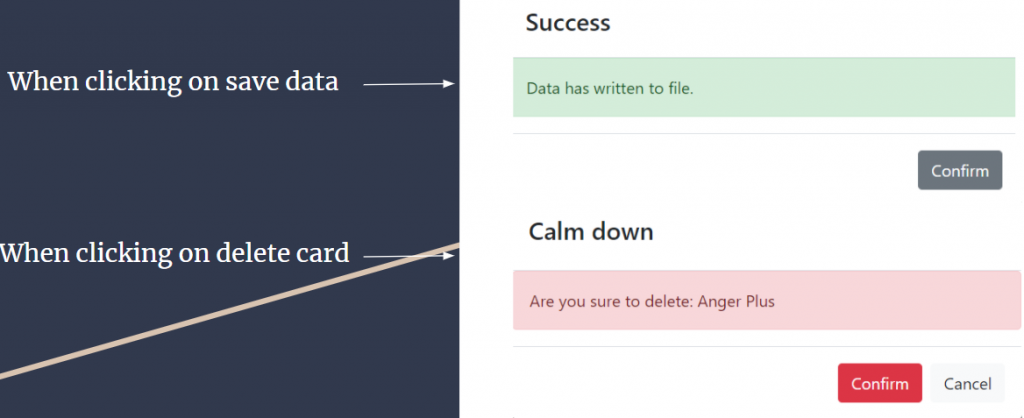
Delete Card Confirmation
One feature we added is the delete buttons for buffs information. After users click on the delete button on the right hand side of buff information, a pop up window will appear for final confirmation.
Videos
As mentioned, here are the videos we created this week when preparing for softs:
Project Introduction Video
https://youtube.com/watch?v=OTCPnB73upE
Application Demo Video
In conclusion, we got a lot done this week despite the Thanksgiving Break. We will now work more on polishing the app and creating a robust documentation of all the work we did during the semester.
This week saw refinement of features in our app. We playtested with a CMU faculty for three consecutive days to get a good understanding of how our app feels and if the data it offers is valuable. We got some good suggestions and have kept working on those suggestions to improve the features in the app. The plan going forward is to make sure that our features are polished so that the app can be met with a graceful conclusion in the coming weeks.
AI Updates
Like last week, there were no algorithmic changes to the reinforcement learning agent. Majority of the work that went in during this week was to create structured data from the training and testing phases of the AI. This is very important to create the visualizations that will be important for designers using the app. Here is a description of some of this data:
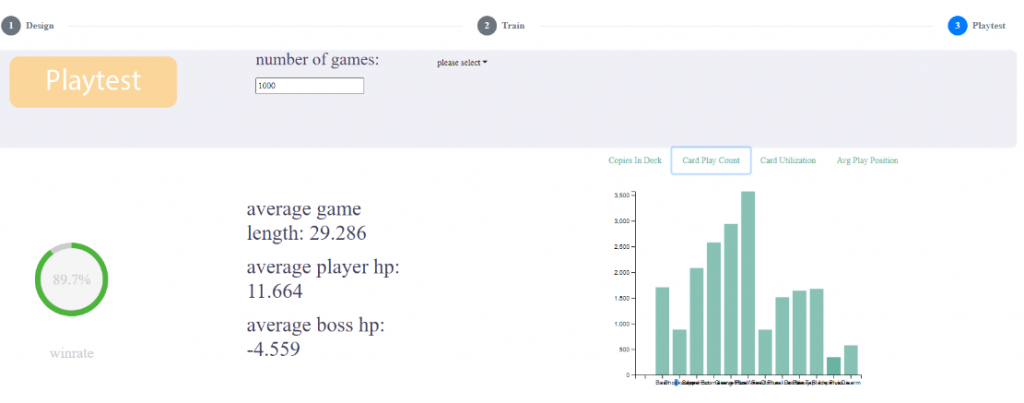
Distributions for Game Length, Game End Player HP, Game End Boss HP:
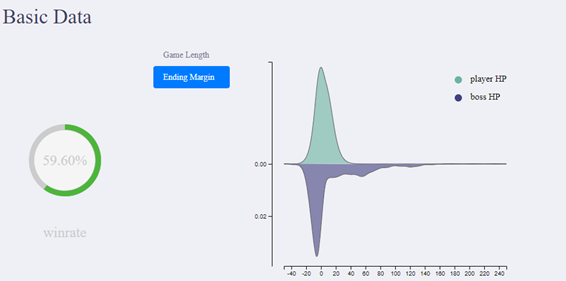
In the last version of the app, we displayed the average game length, average game end player hp and average game end boss hp. But it was pointed out to us that this data in itself may not be very useful because simply an average does not give a good idea of what is really happening. Taking this into consideration, we now show distributions for each of these variables.
Anomaly Games
One of the features that was long pending was a view of some of the anomalies (or outliers) detected during the playtesting the game. Some of these anomalies/outliers include:
The 5 longest games
The 5 shortest games that were won
The 5 games with maximum damage in a single turn
Last week, we worked on making sure that these anomalies are tracked and recorded into a json file in a structured way that saves all the game state information for each step of each turn in the game.
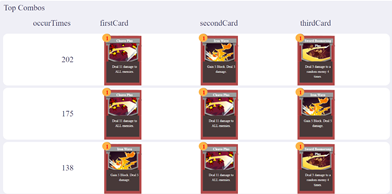
Card Combinations
This was being worked on since the last week. The objective was to show the designer which card combinations were played the most. To this end, we record all combinations of three and four consecutive cards played. For now, the way we visualize this data is to simply show the top 5 three-card combinations. We are still thinking about better ways to visualize this data. A picture of this in action is shown below.
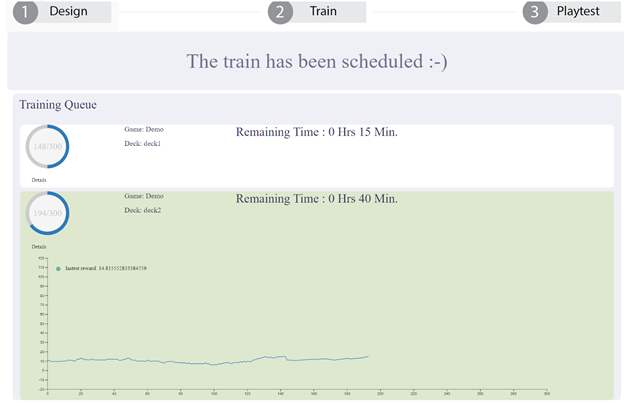
Updates to the Training Section
Training is a very important section because it takes the longest time. Last week, we focused on improving the user experience during training of the app. A picture of how this looks is shown below.
The new features we added include:
Parallel Training
Support for multiple training in parallel.
Training sessions management.
Locking training after you have already scheduled a training on a deck (to avoid repetition in training)
Training Dashboard
Shows all actively scheduled training in the dashboard with basic information.
Marks the selected training( for current deck) with different background colors.
Renders training curve of historical rolling average reward to indicate current training status.
Fetches data and refresh the training curve every iteration
Updates to the Playtest Section
Playtest History
We added a playtest history feature to allow the user to view the completed playtests and compare with different versions. A picture of this is shown below:
The new features include:
Recording playtest history every time a playtest is finished
Searching history and filling the history list when the playtest page is refreshed
Showing basic information (win rate and number of games) on the list
Loading history and rendering the playtest data when the “View Result” button is clicked
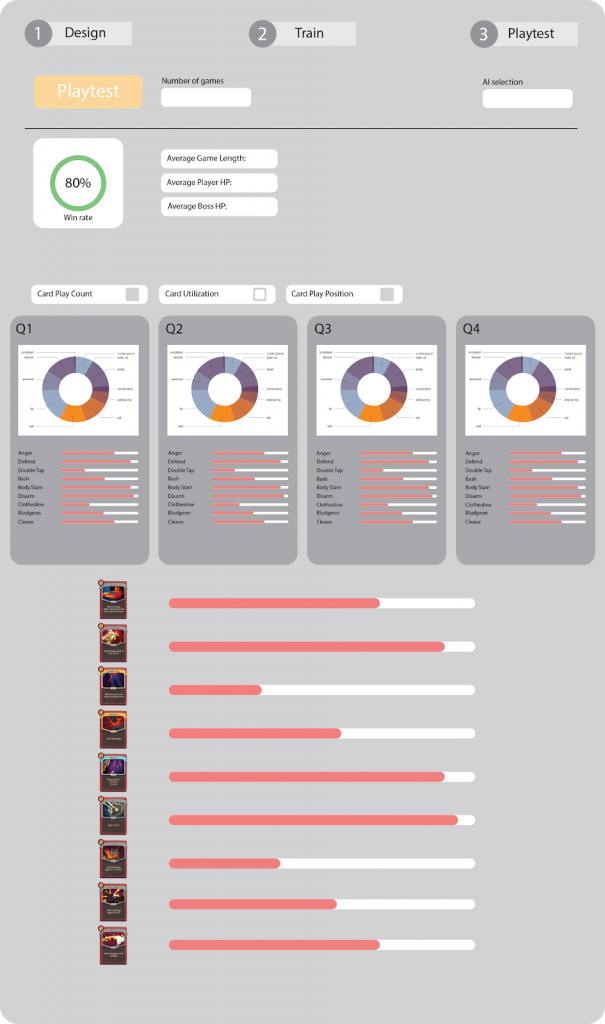
Distribution Visualization
As pointed out earlier, some of the feedback we got showed us that distributions make more sense than average values in some cases. So this week we added distribution graphs for game length, player/boss HP. The following is an image of the distributions of the player and boss hp:
The following is some additional information about how this was achieved:
Used the d3.js API to draw distribution graph
Calculated the probability density from the given data samples from the playtest
Automatically adjustes the domain of the axis to make the distribution properly fill the whole graph.
In the “Ending Margin” section, two distributions were drawn in a single graph.
Marked different distributions with different colors and names in “Ending Margin” section.
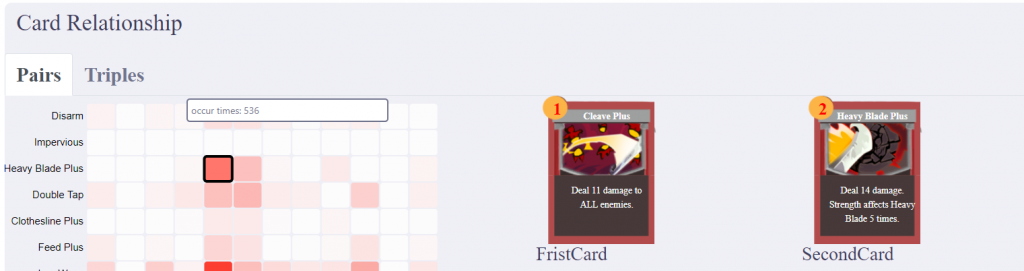
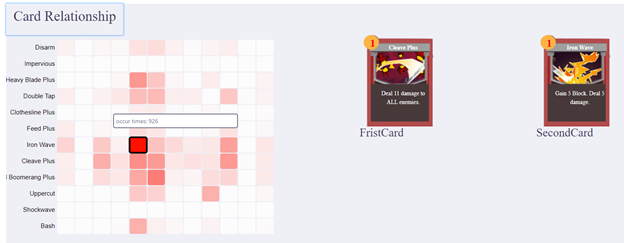
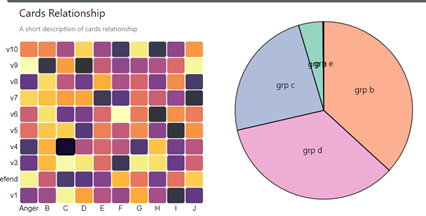
The Card Relationship Table
Another cool visualization that we have is the card relationship table which shows how many times was a combination of two cards played. This is to give an intuitive sense of card relationships. The following is a picture of how this looks:
The following are some details about this:
Once again, used d3.js to draw the svg of the relationship table.
Interpolated the color according to the actual value of each block.
Highlighted the block when mouse hover
Added a tooltip to show exact values of that block when mouse hover.
Displayed the two cards represented by a block on the right side during mouse hover.
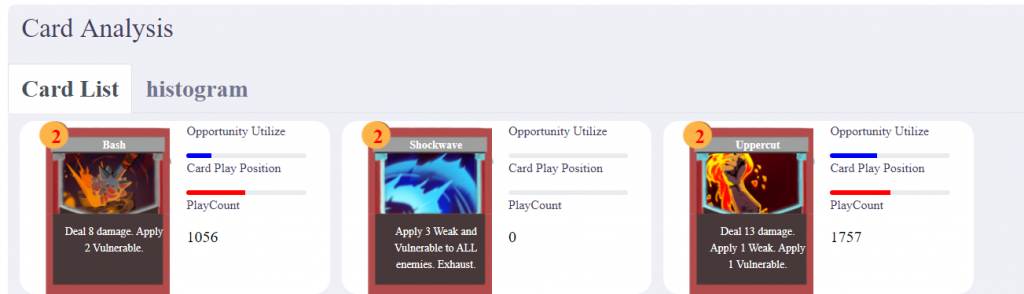
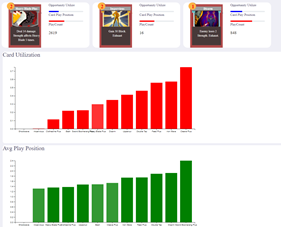
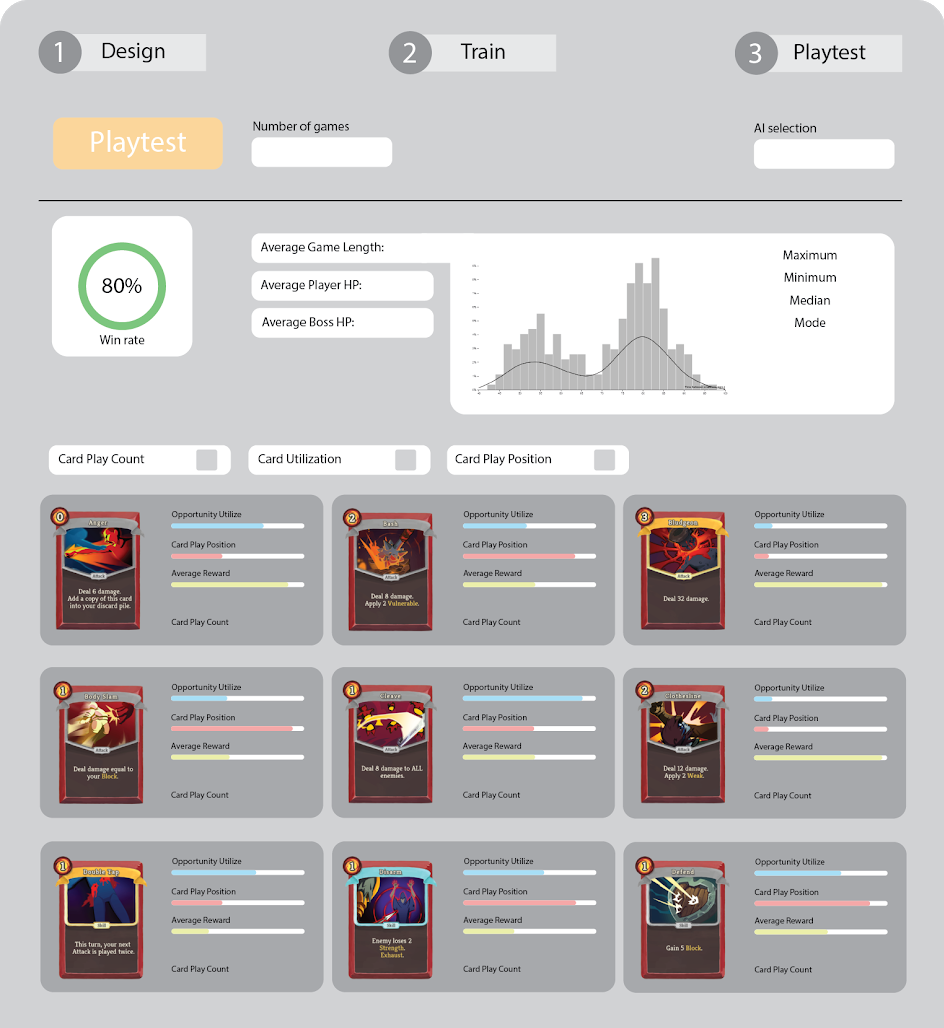
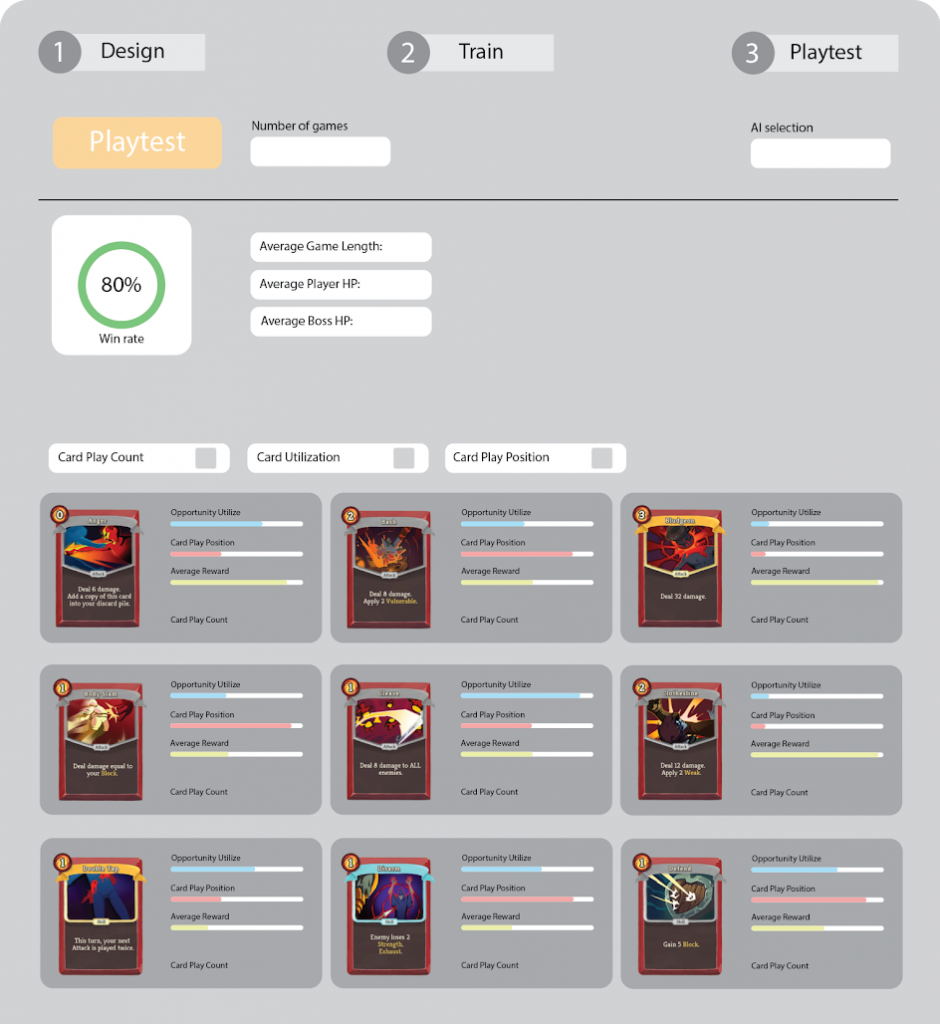
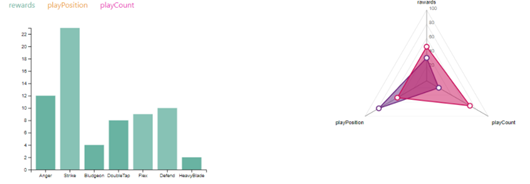
Card Analysis
Although this part already existed last week, we added some improvements to the display of card performance analysis. A picture of this is shown belows.
The following are some additional details about this:
Drew histograms of card utilization, average play position and play count separately
Ranked the order in histograms by values
Drew card images of every card in playtest
Showed opportunities and card play position as progress bar on the right side of card
Showed play count as number.
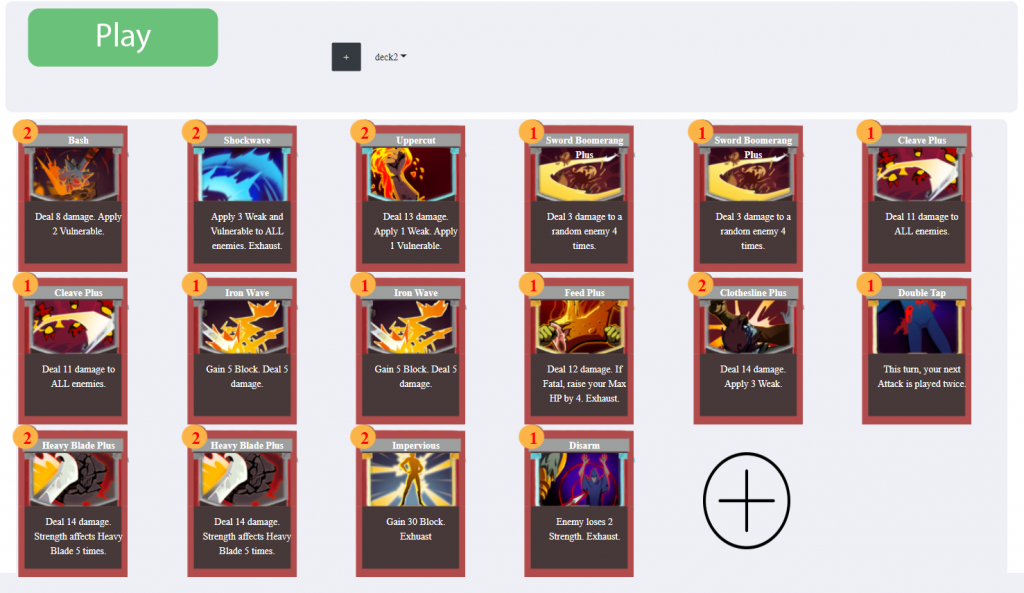
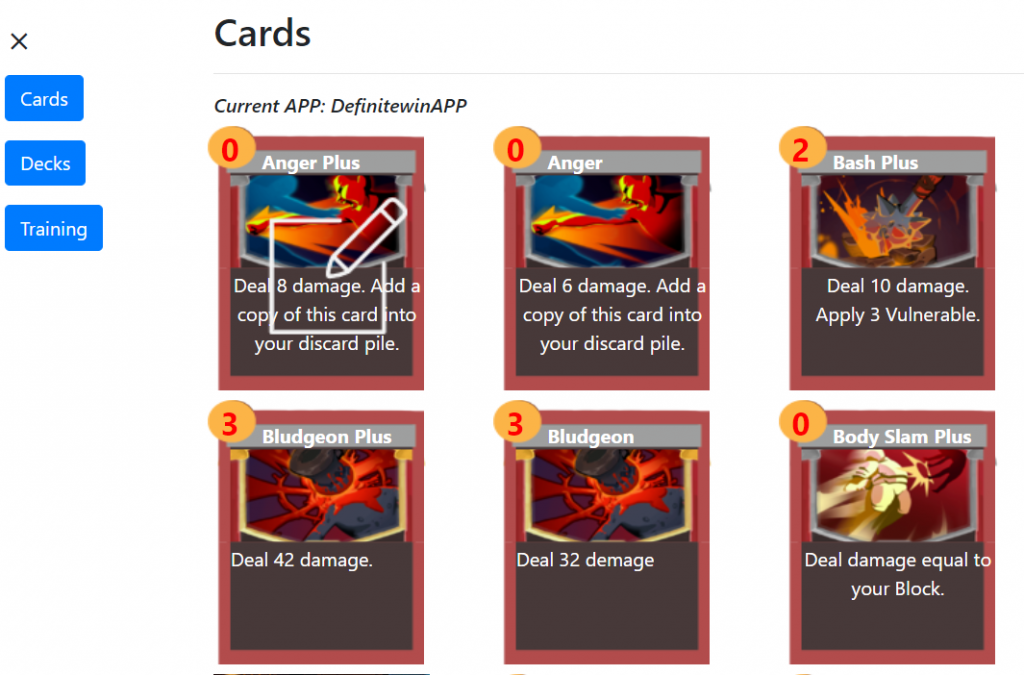
Card / Deck Editing Updates
UI Improvements
This week we improved our UI and functionality for editing cards and decks. A picture depicting this is shown below. There are navigation buttons on the left side to go between edit cards or decks. We also added hover events for every card to pop up edit/add icons.
Add Buffs
This week, we also added a pending feature of adding buffs to cards (in the card edit options). The card edit page can be accessed by clicking on a specific card. We added a “add buff” function for users to include buffs into the card they are editing.
Confirmation
Lastly, we added confirmation modal functionality from bootstrap into our project. The usage includes delete and save as the picture shown below.
Playtest Design : Creating Scenarios to Challenge Playtesters
The goal of our project is to make an AI playtest agent that can learn to play a turn based card game and provide valuable feedback to the game designers. This feedback includes:
Game Balance
Economy Balance
Game Mechanics
Game too easy/hard
Dominant strategy
Card Design
Deck Building
Building a 100% winrate deck
We wanted to test to see if the AI can achieve a 100% win rate given a very strong deck. The following deck has a ~100% win rate when a human plays it so we know it is very strong.
Strike+ : Deal 9 damage *4
Defend : Gain 5 Block *3
Shrug it off : Gain 8 Block. Draw 1 card.
Pommel Strike+ : Deal 10 damage. Draw 2 cards
Flex : Gain 2 strength, and lost it at the end of the game
Thunderclap : Deal 4 damage and apply 1 vulnerable to all enemies
Twin Strike+ : Deal 7 damage twice
Bludgeon : Deal 32 damage
Reasons why this deck has such a high win rate:
Low complexity
It only has 8 different cards, 1 debuff for the boss and 1 buff for the player.
It only has 13 total cards, each card gets recycled very fast.
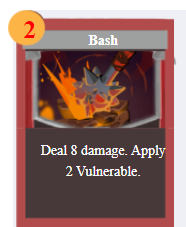
Bludgeon
A very useful card that dealt significant amount of damage
Flex
0 cost card that can boost up attack cards.
This card should be played first when drawing it, this will be a good reference for us to see our AI’s strategy.
What did we learn from this deck?
Actually this is not the first version of the deck. In the very first version, we had Bludgeon+ and Bash+ instead of Bludgeon and Thunderclap. And we had a 100% win rate. The reason we decided to change that is because the player could always win by only playing attack cards. If we use the deck to test our AI, it could have a very high win rate even if our AI is not sophisticated enough.
Instead, with the current deck, a random bot will not work. The player needs to manage when to play attack and when to play defend. During the human playtest result, the ending margin of player HP and boss HP are pretty close.
This week saw a lot of polishing to already existing features and addition of a few new features. We hope to continue doing the same for the next week as well.
This week was focused all on integrating the AI into the app and making sure that the one-click-training works correctly. We also focused on creating a new version of the app with reduced complexity as a result of faculty feedback we received indicating that our app can feel a little overwhelming as a result of the complexity. Lastly, we also focused on some UI design for the data visualization.
Testing Using AI
The main idea behind the project is to facilitate playtesting. In past weak, we reached a stage with the AI where it is performing quite well and it can be integrated into the app as a playtesting entity.
This week our goal was to finalize the intergration to the point where the build can be sent our to others for testing.
The flow for getting this done involves 3 stages:
Creating a Deck : The first step is to create a deck using the available cards (you can create your own cards as well). This is where the game designer’s expertise comes in. A deck can be very strong or weak depending on the cards it has.
Training the AI : Once the deck has been created, an AI agents needs to be trained using Reinforcement Learning. This process takes significant time. The recommended number of iterations to train for to get stable winrate is around 10,000-15,000. The improvements after 15,000 iterations are marginal because the model gets stuck asymptotically. 15,000 iterations may take anywhere between 7 to 8 hours.
Playtesting with the Trained AI : Once the AI has been trained, you can playtest with it. To generate sufficiently large playtesting data, you need to allow the AI to play for 2000 games or more. This may take somewhere around 10 minutes.
The final result of playtesting are the graphs and metrics that are visualized for ease of interpretation. We will get into the details regarding that in the following sections of this blog post. Depending on how strong or weak your deck was, the AI will come up with data reflecting the same.
New Version of the App
This week, we worked on redesigning the entire app to make it easier to use and understand. The goal is to keep the functions comprehensible for new users.
Workflow of the ‘Basic Mode’
We segregated features of the app into basic mode and advanced mode.
In basic mode, there is a very straightforward workflow: design, train and playtest. A picture of how this looks is below:
Features in the Design Section of the Basic Mode
In the design part of the basic mode, you can:
Switch between current decks
Add/remove cards from a deck
Create a new deck
Play your designed game in Unity
An image of this is shown below:
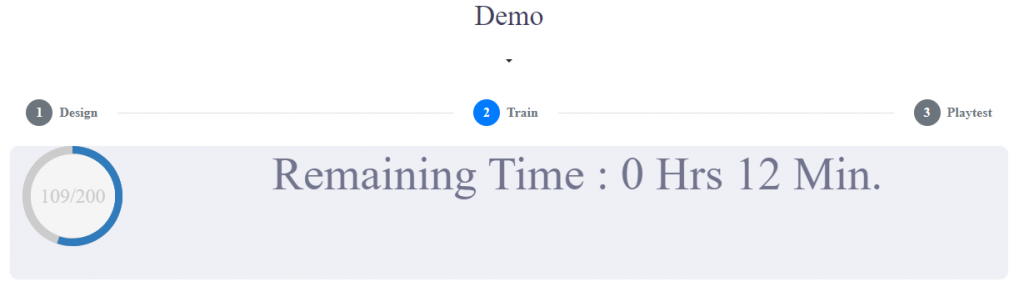
Features in the Train Section of the Basic Mode
We allow the user to select how many iterations to train for. Then just by simply clicking a button, it will connect to our AI module to train the AI on the currently selected deck/game.
This can happen because all our code about AI and gameplay are designed as generalized frameworks in the first place! An image of the training section is shown below:
Features in the Test Section of the Basic Mode
Playtesting is as easy as training the AI agent and is much faster. You can select a trained AI agent and playtest using it to quickly generate data and visualize it. The following is a picture of our current test section.
Practice with the Web GUI
We implemented the whole basic mode within a single week. By using the web techniques available in electron, we can change the layout and functionality of the UI efficiently.
Compared to UI systems we worked on before(such as Unity’s UI), we find the combination of css, bootstrap and jquery is very powerful in our development process.
How does this help us?
Responsive UI : HTML has very good support for responsive UI in different sizes and resolutions. With the grid system in Bootstrap, our UI always looks good no matter how the window size is modified.
Flexible UI : HTML has the concept of DOM; it organizes UI elements in a tree-like structure. This allows us to modify dynamic UI elements and change UI layout efficiently
Stylized : CSS has a very decoupled and flexible way to change style.
Built-In interactions : Bootstrap has many built-in interactions, such as modals, sliders, collapse, dropdown, etc, which cover most of our needs.
Disadvantages
Hard to build UI out of the framework : These techniques are very hard to use if the goal is to create UI which cannot be described in existing elements, such as buttons, divs, etc. For example, when we try to render the card with dynamic information from the database, we need to manually tune a lot of the CSS properties.
Pool animation support : Compared to game engines like Unity, web techniques have a bare-bone animation support. For example, even a simple round progress bar shown below takes a lot of work because of the poor key-frame mechanism.
Infrastructure of our Build
As mentioned last week, we don’t have good infrastructure to support our multi-platforms build process. This week, we have made it organized and easy to configure.
Problems we were facing
Manual operations : Every time we build our app, there are some manual configurations and operations. While we make builds frequently, this is not only inefficient, but also causes many bugs.
Messed up Build and Development code : A lot of behavior and code is different, especially when it comes to file paths. Sometimes in order to simulate how it works in the build, we switch the code back and forth between the latest code and those in previous builds.
Solution
Automate the build procedure : We put all build relevant information in one file like config.json. Then we wrote some scripts to create the final build based on these configurations.
Divide project into build mode and develop mode : We encapsulated all operations having differences in development and build modes. Then we can switch between different modes with the configuration file very easily.
Challenges with the Build
An issue with the build we found this week was with the Windows character limit for file paths. Tensorflow creates a long file names for some of its files that store variables and it can cause some unexpected errors because of the windows limit being violated.
It took us a long time to figure out what exactly was causing the error because nothing explicitly pointed to a problem with long file paths. Once we did figure this out, we reduced the lengths of the folders that store these tensorflow models as much as possible. However long file paths are still an issue for us and we are yet to think about a good way to ensure this does not happen in the future.
Card and Deck UI in the Advanced Mode
The more complex features of our app have been bundled up into the ‘Advanced Mode’ which is a more complex counterpart of the Basic Mode. This week also saw some major redesigning of the Advanced Mode.
We restructured the UI in advanced mode by using Bootstrap, mainly in the card edit page and the card list page. The left side is a navigation bar to make users navigate through other pages. We made the card editing functionality by clicking on the card images to make it more intuitive.
Below are some pictures of the redesigned UI:
Playtest Plan: Video and Survey
We planned to launch our playtest video and survey this week. Due to multiple challenges that we face on development, we failed to create our build on time. We believe it is better to leave this part for now, and come back to playtest after we finish most of the app functionality. Some materials may be used to create our trailer video/project intro video.
Data Visualization Mockups
Below are some screenshots of some mockups of how our data visualization (generated in the testing stage) should ideally be presented.
Basic Playtesting Data:
2. Average game length : shows mean, mode, max and min.
3. Card Utilization : Broken down by different game periods; First quarter, second quarter, third quarter and the last quarter.
4. Card Play Position
All in all, this week everyone was involved in working on the app. The design changes makes the app look much more accessible. We want to ensure that we place it in the hands of designers to see where they take it.
This week was all about bringing together our app so that it can be used for playtesting. There was a significant progress on this front with multiple different windows in the app being added. There was some minor progress on the AI front which bumped the win rate up to a stable ~82% and a peak of 88%. This brings us closer to our goal of 90%. However, experiments with the AI have slowed down because a lot of our efforts are not focused on completing the app for playtesting.
AI Updates
There were three areas where the AI made progress this week. Let’s get into each one by one:
Reward Function
In another update to the reward function, we decided to use a peculiar kind of reward function. Up until now, we were using a Monte-Carlo estimation of reward for a state action pair. This meant that we take the final reward of the trajectory at the final step, then go back one step at a time and assign a reward (discounted by the number of steps from itself to the final step) to each state-action in the trajectory.
This week, the peculiar thing that we did was to first calculate this reward for each state-action in the trajectory and then use this to create something similar to a temporal difference target. This is achieved by going up the trajectory starting at the current state and replacing the current state-actions’s reward by an addition of itself and the next state-action’s reward.
This seems like a weird thing to do but it did end up giving us a little bit of a better result than what we have received earlier.
Reducing Model Complexity
As a part of the push we are making to go towards creating an application for designers to use, we want to reduce the time it takes to train an AI model. One of the ways this can be done is by modifying the hyperparameters. For one, we reduced the model complexity by reducing the number of layers and also reduced the number of neurons on each layer. Another thing was to reduce the batch size during training. Earlier the batch size was set to a much higher value than required (512). Reducing the batch size delivered the same approximate win rate. A potential benefit of this could be that we are avoiding overfitting.
Integration with the App
The last important piece of progress this week was to complete the module that allows training by clicking a button on the app. You can also watch the progress of training as well as watch as the progress of the app improves. Currently, this is the only feature in place but we are working on creating test data using the generated model and then visualizing that data in the app.
Build Across Multiple Frameworks
This week, we successfully packaged everything; unity, python, tensorflow and electron into one executable. This allows us now to distribute our application easily to playtesters.
Main components of build
When we work on Unity, Unity itself helps to build the game in Unity. When working on electron, we use electron-forge to build everything in the electron.
However, our application uses both unity, electron and python. Unfortunately, there are no official tools to build them together.
Electron native build:
We use electron-forge to build resources managed by electron. The main difference between normal electron build and ours is that there are many resources not managed by electron, such as unity code and python code.
Unity executables :
There are two Unity executables. One is a GUI for playing the game, and the other is the record playback tool. In an ideal situation, these 2 should be combined into one app. Since unity builds are very small, two builds are acceptable in size.
Python build:
We discussed how to build python into unity in a previous blog post (Week 6). We analyzed the pros and cons of different approaches. We yet again decided use “python interpreter + source code” for the same reason
Database
These are all static files. These need to be copied in the correct directory.
Several tries in python build
In the past, we said we built our unity app using the approach “python interpreter + source code”. But we actually only did half of it, the source code. We didn’t consider the python interpreter, in other words, the python environment.
Providing an installer in the electron app
We put a python installer into the build, and provide the GUI for user to install python and tensorflow.
This didn’t work well when we tested on a teammate’s computers. One of the problems is that there are many installation configurations, such as version, path,etc. Unknown problems can happen if users don’t configure it in the right way. An additional problem is that some teammates already have installed the python in their computer, but with different version and environment.
Prebuilt python environment into electron app (Final choice)
To make the python environment more stable and convenient, we preinstall the whole python environment, including interpreter and dependencies, into the final executable.
Even though the final build grew from 250MB to 1.6GB, the build is stable and under control. This is very important for us because our app is built across so many frameworks.
Insights and Problems
Build cross different frameworks/platforms
Our project is an example of multiple frameworks and platforms. When we want to distribute our project by binaries, we consider two stages:
Stage1: Prebuild
First stage is to build all modules in their native platforms, as we discussed in Unity, electron, and python. In our case, our biggest challenge is to build all of the python code.
Stage2: Combination and Communication
When we say combine the build, it’s mainly about how to manage the paths, how to read files in the build files. Almost all frameworks (in our case, Unity and Electron) have their own way to get dynamic relative path during runtime, so this is not a problem.
As for the communication, because we use socket to do the inter-process communication, as long as we use the right port, the operating system will handle the rest.
Develop mode V.S. build runtime
Most frameworks have separate code for development and build. We have the same situation, because the way we find code in other platforms is different between develop mode and build runtime.
Now we need to manually redirect the code (latest development code or code in last version’s build) during development. This is very inconvenient and can potentially cause a lot of bugs.
Our solution in the coming week, is to automate the multi-platform build procedure so that we manage the relationship between development and build. Manual operation is the devil, we need to wipe this out of our build procedure!
Data Visualization
This week we learnt how to use d3.js to build interactive and professional data visualizations. We can use it to develop the different kinds of data visualization we discussed last week. The data we currently use (in the pictures below) is dummy data. However, in the next week, we will get real data from AI Playtesting.
All in all, this week saw some much needed progress on the app. We are excited to see how playtesters respond during the playtesting session on 10-11 Nov.
As is evident from the title of the blog, this week involved taking more steps towards making our tool more accessible to designers. There were a few AI experiments and bug fixes. However, we did not see any improvements in the winrate (currently at ~70% for our base deck). The real progress this week came from the app building end which focused on making our tool more friendly for designers. This was our main focus last week and has continued on for this week as well. Currently, we are tirelessly working towards building a single application for playtesting it with designers on Nov9-Nov10 . Needless to say, this will be the focus of our work for this and next week as well.
AI Updates
This week consisted of several experiments without yielding any significant results. There were also a couple of bug fixes which help present data more accurately in the training excel sheet.
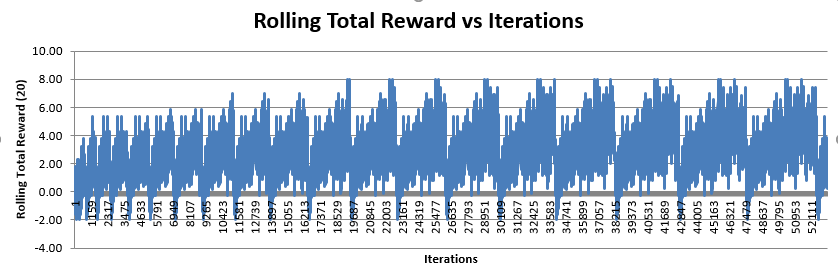
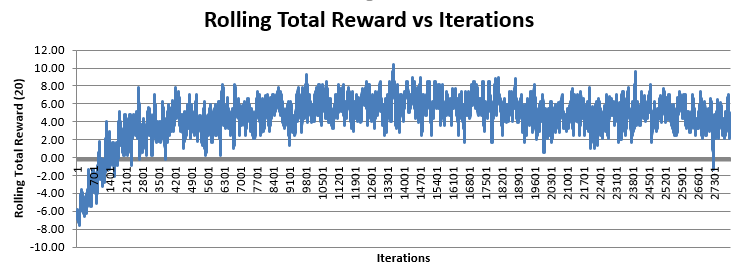
Recurring Reward Drop Bug Fix
Continuing from the previous week, the focus on the AI front was to figure out why the reward was dropping periodically during AI training. An example of this from last week can be seen below.
The theory we initially came up with was that something was going wrong which caused the agent to ‘forget’ everything it had learnt and start again from scratch. However, the actual reason did not have much to do with the agent. In fact, there was a bug in the data collector script which is responsible for collecting and storing data from the training process and then writes it to the excel sheet. After fixing the bug, the training graph now looks something like this:
This graph now looks much more like a reinforcement learning reward graph with steep rise in the average reward at the start and then becoming stationary over time (with some noise).
Start with High Discounting Factor (Gamma)
One of the things we tested this week was to keep everything else the same but start with a high gamma value. The reason we moved to an incremental gamma earlier was because the model would hardly learn anything and would converge very early to the reward value of playing an unplayable card. Meaning, it would try to keep playing unplayable cards and keep losing.
So why did we try this again. We wanted to lay more emphasis on future rewards because it could be the key to further improve our winrate. Also, now that we had a model which could give stable results, we figured we could go back to the earlier method and see if we can make it working with help of our newer model.
Unfortunately, the model suffers from the same problem it did before. The model never even crosses the first step of learning which are the playable cards in the current turn and playing one of those.
We also tried bootstrapping the model using a trained model which had a ~70% winrate. Even this did not really change anything. The model still was not able to learn how to play playable cards. We think the problem here is that with a high gamma, what can happen in the next state take precedence over the current state and causing an unrealistically high q-value for unplayable cards.
Desktop App – Design
We now come to the desktop app design which is where a lot of effort was focused this week. Last week we made a decision to use electron to build a desktop application which includes all tools. We had just started to learn how to use electron. This week we have made solid progress on several key features of this app.
The following are some of the features we implemented this week:
Environment detection:
Our project relies on a specific version of python and tensorflow. Thus, we need a mechanism to ensure that the user has the environment to run our application properly. We are now able to detect the environment when the application starts. Next step is to help install modules of the environment if the user doesn’t have them.
Game Project management:
As designed before, our app can have multiple games with different cards, rules and decks. Hence we need to allow the user to view existing game projects and remove and create new game projects by just clicking buttons.
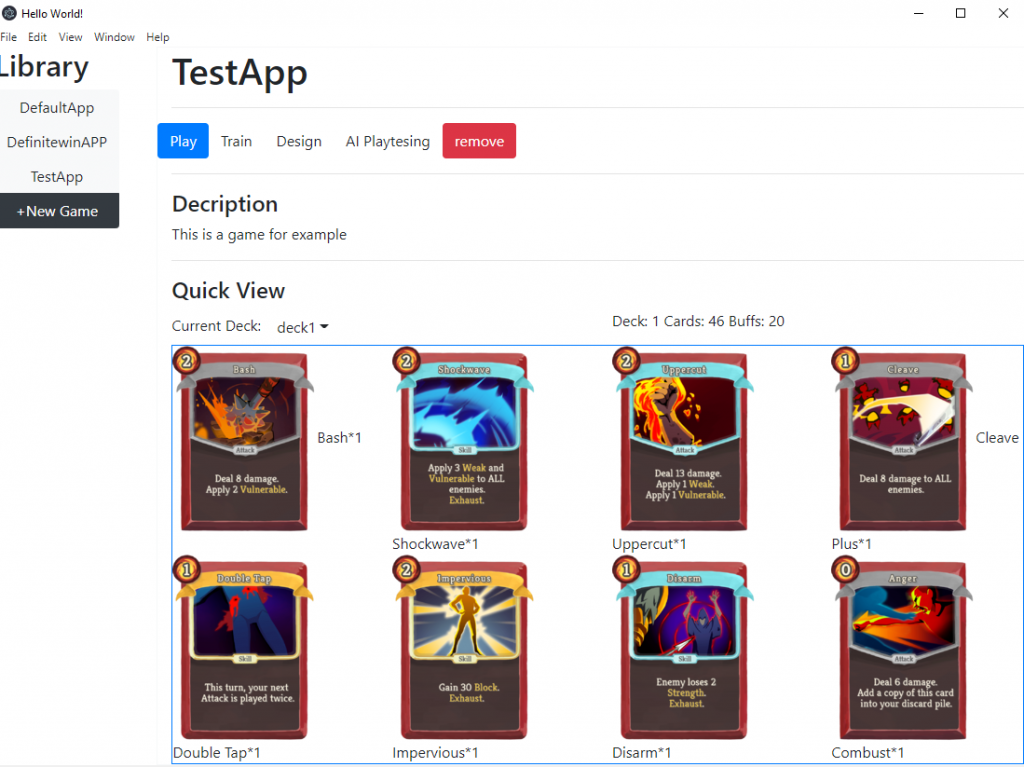
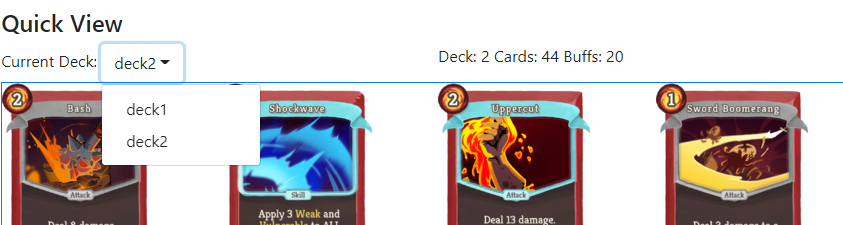
Quick view and shortcut operations:
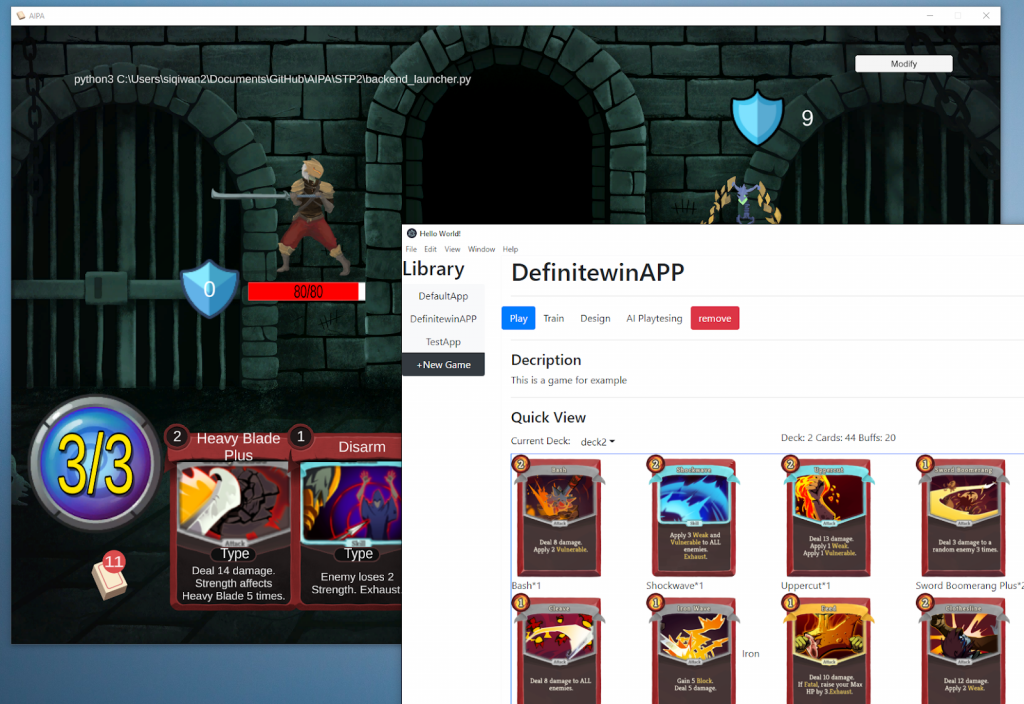
We implemented this “quick view” section on the game’s page (picture below). The purpose of this section is to let users have a basic understanding of what games look like( what are cards in the deck, which deck am I using, etc). Another goal is to facilitate shortcuts operations like switching to another deck.
Main operation of a game project:
We have several operations we need to build for: play the game, design the game, playtesting or train the AI. This week , we made “play” and “remove” operations work. When you click “play”, electron will launch the Unity app to load the game you select.
Desktop App – Components
Our app is a single place for many different aspects of playtesting with AI that is brought together as a unified system. Here are some of the key components that we worked towards this week:
Data visualization
Data visualization might be the most important part of this app. However, drawing graphics, especially interactive ones, is quite difficult and could prove to be very challenging.
Naive/Low-level solutions
One of our discussed solutions was to draw data graphics by using svg, since html standards support this format. We could even use a library like WebGL. Even though this allows us to have highly customized graphics to show our data, building a data visualization module from scratch is out of our scope and involves a lot of unnecessary work.
Data visualization Library
We then turned to Javascript, which has many data visualization libraries. We finally choose d3.js (https://github.com/d3/d3 ) among others for 2 reasons:
Independent: Many other data visualization libraries( such as Victory, Rechard,etc) only work with some front-end frameworks like React and Vue. d3.js is easier to integrate since it only needs javascript
Community resoruces: We found that there were abundant templates and tutorials of d3.js on the internet.
Database
There is a lot of data that can be manipulated using this app. This week we also wrote a database module in javascript to manage that. We had 2 options for this:
Python database module + RPCs:
We already have a database module implemented in python. Javascript uses a RPC mechanism to call python to get the query result. This is nice because the code is consistent and doesn’t have duplications. However, building RPCs, even with 3rd party libraries, is highly time consuming.
Javascript database module (Our Choice):
We decided to write a javascript database module because we found this to be the quickest. Even though there are duplicated code both in python and javascript, it is under control because over 70% of the functions of the current database are all about reading and parsing static files. As long as we make the rules of static files’ paths and names consistent, javascript and python can all follow these rules.
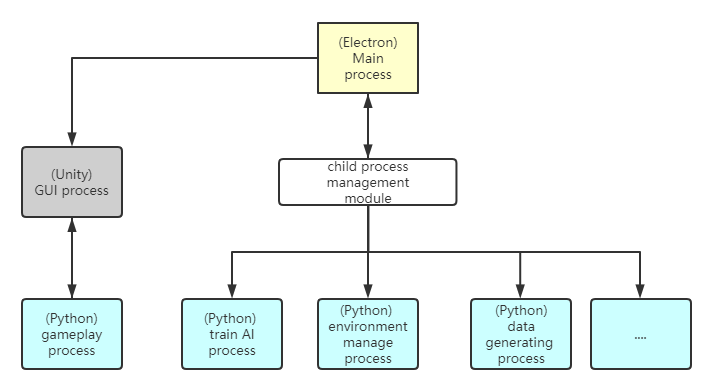
Multi-processes design
A lot of the core logic of our app is written in different languages. For example, we use Unity to build game GUI but AI and gameplay are implemented in python. So our desktop app has to be a multi-processes one.
Electron has good support for managing child processes. As for process communication, we are still using sockets because we already have this codebase on the python side.
Below is a relationship of the different processes:
Why do we separate the python gameplay process with other python processes? : The nature of inter-process communication is different. Communication between unity GUI and python gameplay is much more complicated than others. The protocol between them is a comprehensive client-server style. But the communication between electron and python is RPC style: just call functions and get results.
Another reason is that historically in our project, communication between Unity and python gameplay is highly completed. There is no reason for electron to act as a middle man passing messages between them.
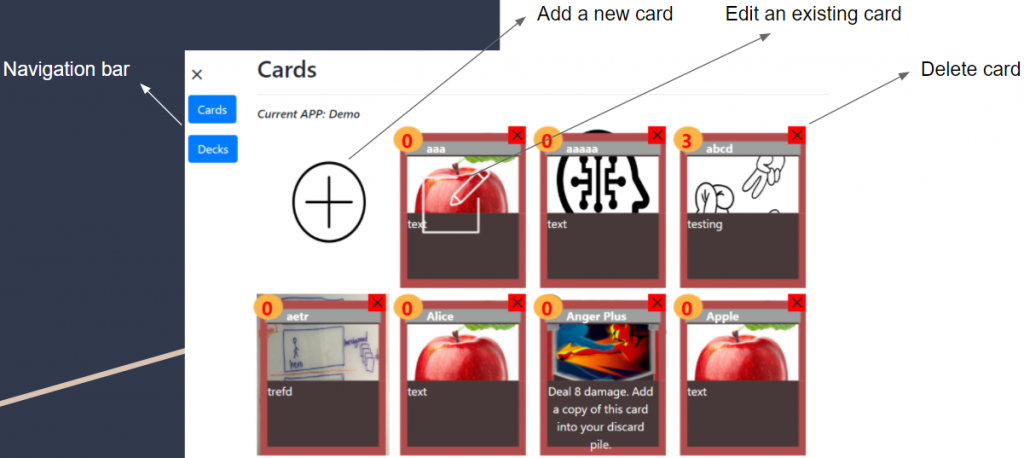
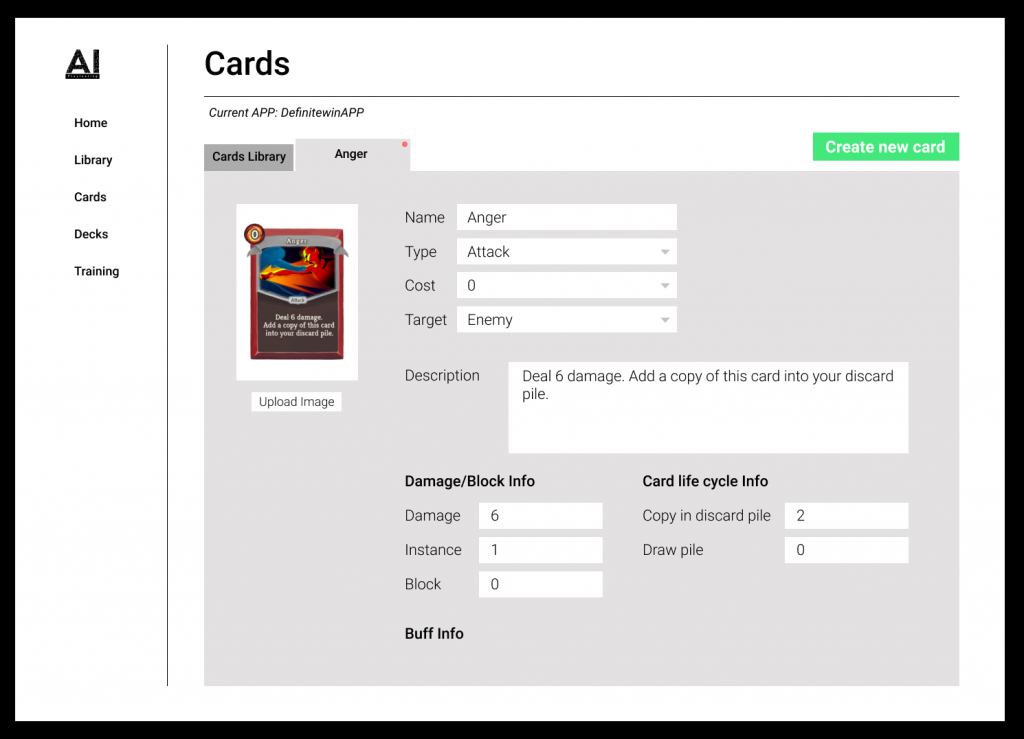
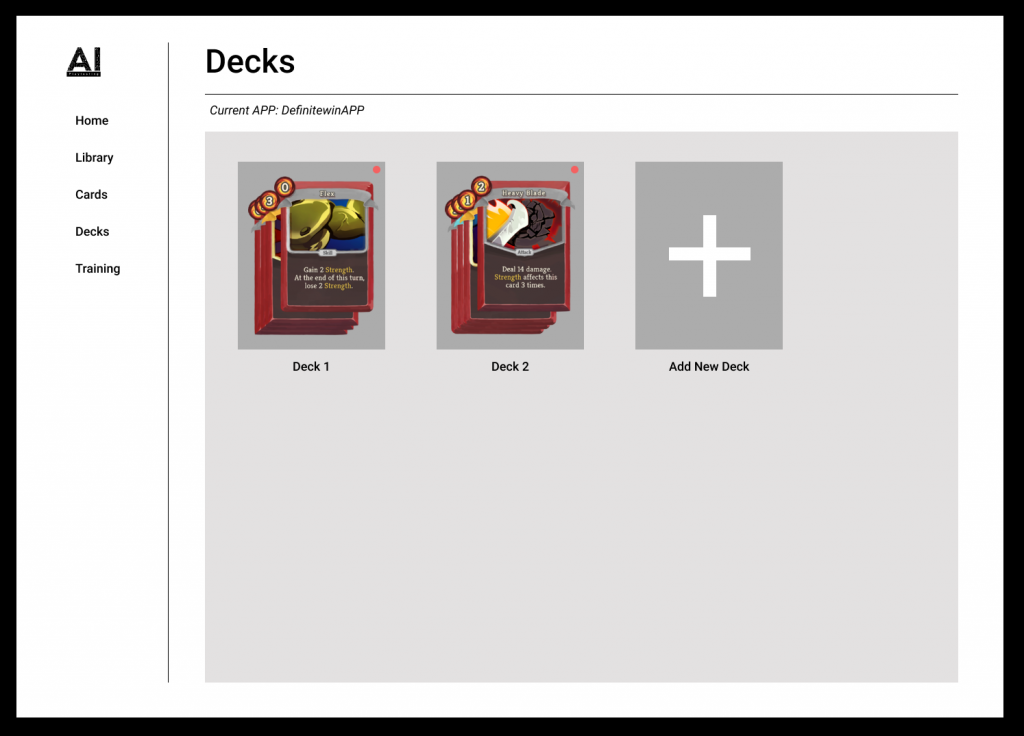
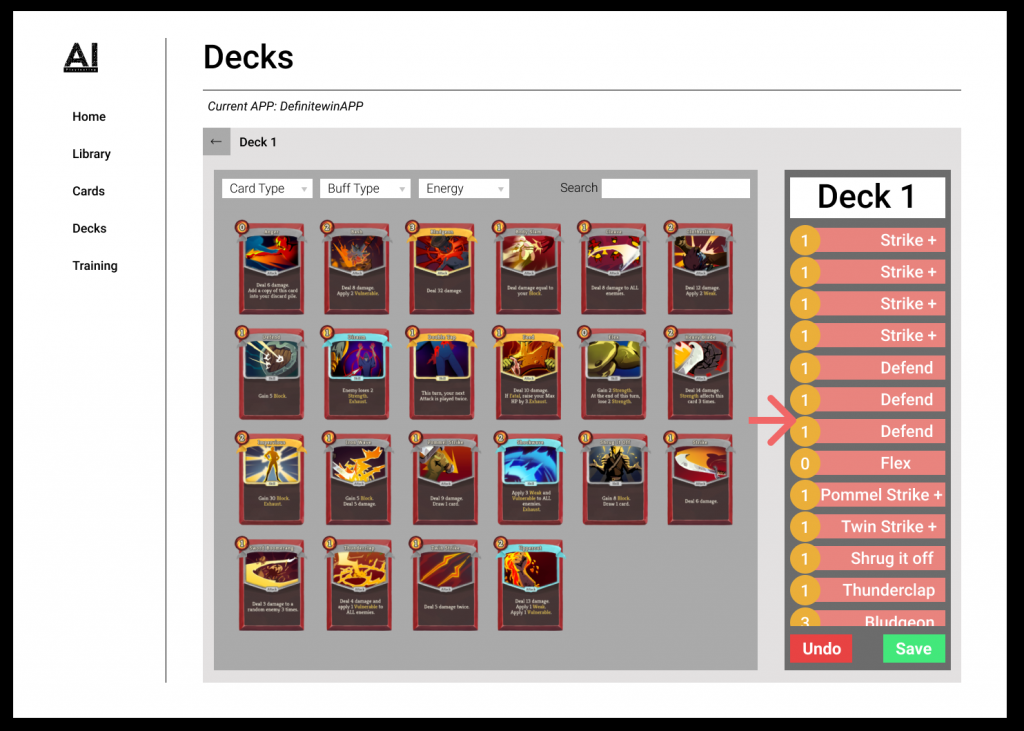
Card Editing and Deck Building
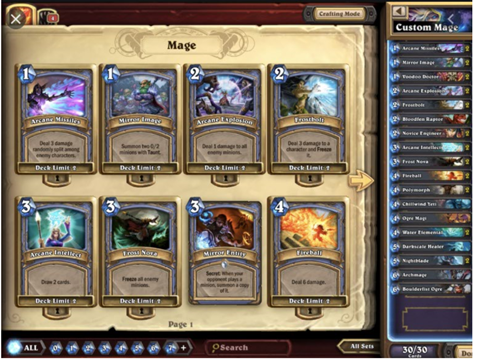
This week our team discussed card and deck editing functions. The two functions were separated into two different pages, but we improved our design by creating a dashboard to visualize the current player’s cards and deck at the same page. The idea we got referenced the popular card game by Blizzard called Hearthstone. We want our card/deck building system to look similar to the screenshot below from Hearthstone:
Screenshot of deck building in Hearthstone
Inspired from this, the following are the function specifications that we are implementing.
Dashboard page: This page shows existing cards and deck information in a particular game version. By modifying card and deck data, users can build a custom deck, trying their own combination of cards to playtest a game version. Here are some functions that we have built for this system:
Card:
Add a new card: go to a page where users can fill in information and create new cards. (done)
Edit card: go to a page where users can modify information for existing cards. (done)
Delete: click to delete card.
Add to Deck: add this card to deck.
Search: search by name.
Filter: filter by energy or other custom criteria.
View card information: hover on card picture to show description.
Deck
Save: save changes being made by the user. (done)
Indicator: Changes being made will be highlighted in light blue background.
Add new Deck: add new deck.
Undo
A screenshot of our current dashboard page can be found below:
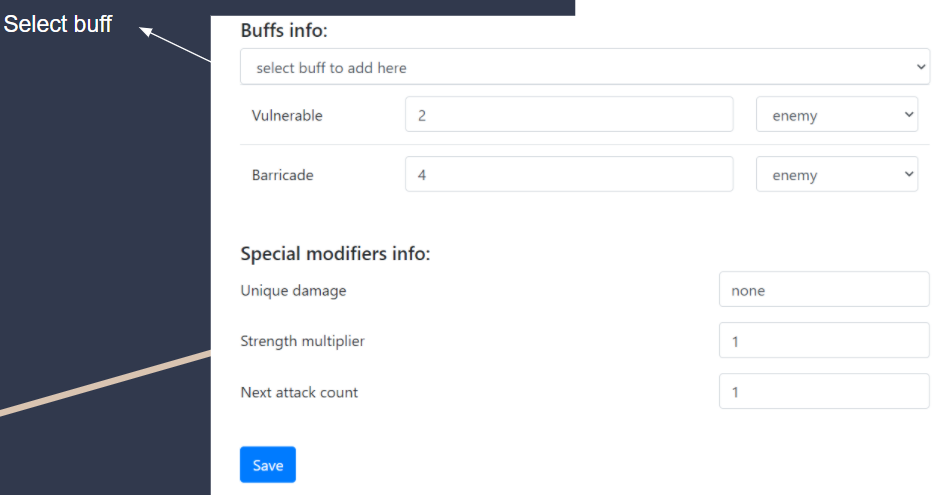
Edit Card page: the purpose of this page is to create custom new cards and modify existing cards.
Select bar: Select bar to jump to another card editor. (done)
List information: List all information required to create a card. (done)
Save: save changes being made by user. (done)
Indicator: Changes being made will be highlighted in light blue background. (done)
Sanity check: input number should be in the range between 0 to 100. (done)
Add buff: Add existing buffs to a card.
Image upload: click to upload custom image.
Screenshot of the Edit Card page is shown below:
UI Design
Based on the design and architecture described above, we did some UI design for what our app should finally look like. Below are screenshots and description of the same.
Home Page
Left Navigation bar is similar to the Epic Games Launcher. The functions on the sidebar include:
Home: Home page, our website, resources, etc.
Library: Game app, you can create different game apps here.
Cards: Create cards in a pre-selected game app.
Decks: Create decks in a pre-selected game app.
Training: Start a training program in a pre-selected game app and card deck.
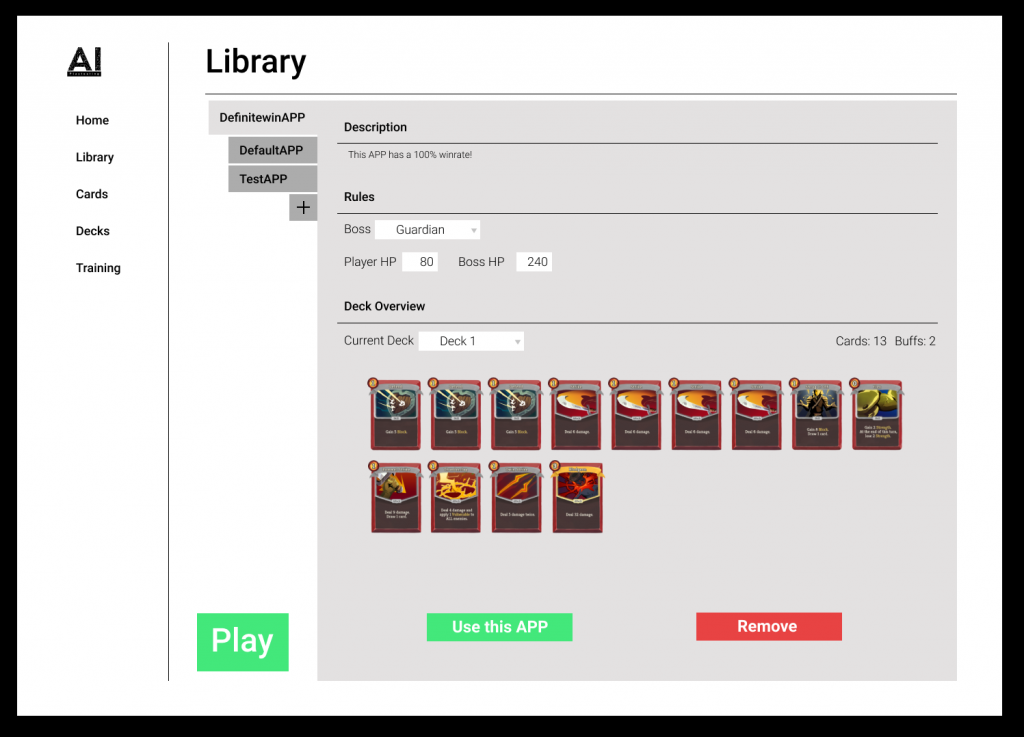
Library Page
Left tabs shows a list of all the current game versions.
Description: Description of this game version.
Rules: Rule set of this game version.
Deck Overview: An overview of all the decks and the option to select one.
Use this App: Select a game version
Remove: Delete this game version.
Play: Play this version of the game in Unity.
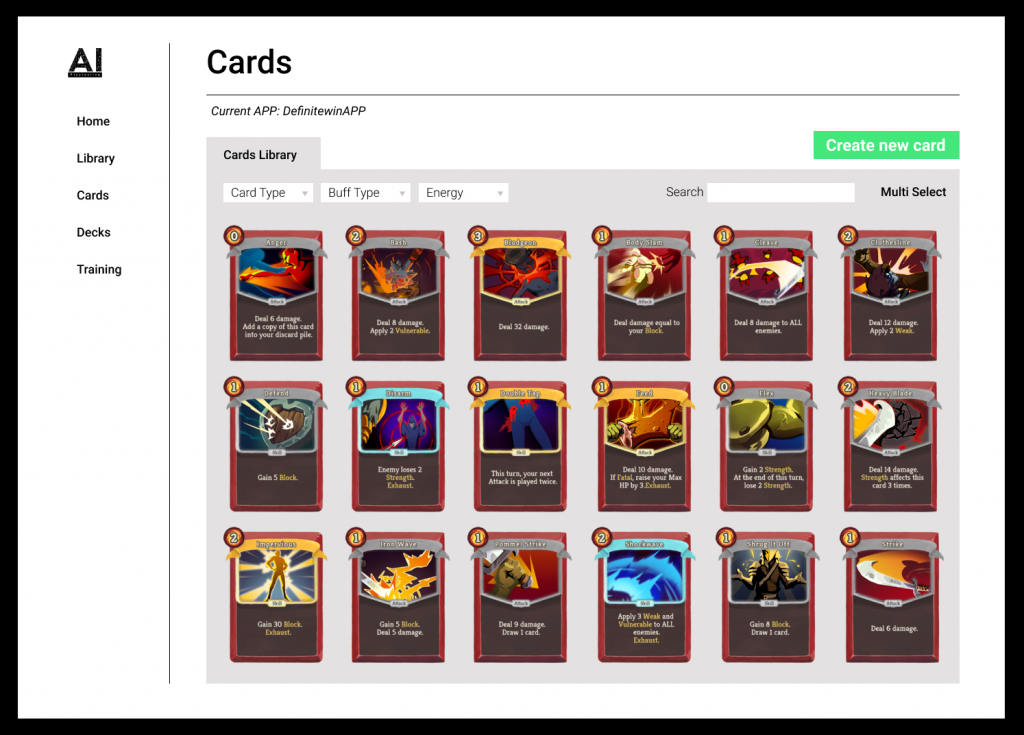
Cards Page
A page that shows all cards.
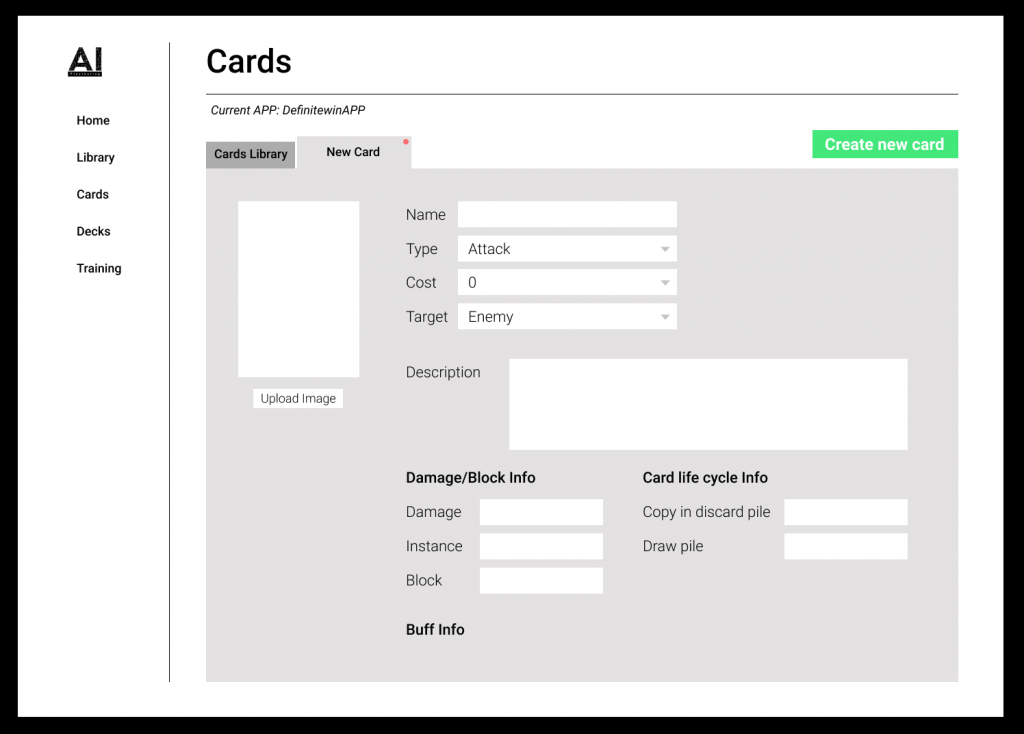
Create New Card
Edit Existing Card
Deck Page
A page that shows all the deck in the current game version.
Deck Editor
All in all, this week saw a lot of progress on building the app. The next week is also going to focus heavily on building the app because of our playtesting deadline. We hope to create something that is simple enough for designers to use!
The biggest event this week, of course, was the halves presentation on Monday. It went pretty well and we got some nice feedback from the faculty later. The progress this week was a little slow on the AI. On the other hand, we have started worked towards an all-inclusive app that will combine all the different pieces that we have been working on. The team also had meetings with some game design faculty this week to try and understand what are the things game designers would potentially look for in a tool like the one we are making.
Halves Feedback
Here are some avenues we can improve on considering the feedback we received:
We could have been more clear to show how the AI is improving over iterations
It was tough to get a clear sense of what we can learn from the AI expert
Comparison to other machine learning techniques can fetch us some comparative data on how the agent is performing
We need some sort of external validation (perhaps from ML faculty)\
We need some playtesting with designers
We agree with all of these points. Over the last few weeks, it has become increasingly clear to us that we need to shift out approach to ensure that we appropriately serve game designers. Up until this point, the focus of our product has been on the technical side. This was logical because without a sound technical foundation, we have no product. However, now that we have an AI that learns to perform decently well (~70% winrate) which enables us to start thinking about serving designers.
External validation is a highlight from this feedback. We need external validation from ML faculty as well as from game designers about how easy it is to use our product. Although our winrate has improved significantly, we believe that there is still room for improvement. Going the last mile is going to require effort and a deeper dive into potential machine learning techniques. Validation from ML faculty could help with this. On the other hand, validation from game designers is absolutely crucial because at the end of the day, this tool is being built to serve them.
AI Updates
This week did not see any big jumps in the AI performance. Although, we have managed to improve winrate by around 10%. Last week, we had achieved a winrate of ~61%. This week, we have improved a little and are achieving a winrate of ~72-73%.
The technique behind this change involved getting rid of the elaborate reward function we had earlier. This reward function was designed in a way that each card had its own individual logic for calculating reward. The reward function for the card Flex for example, would look at all the attack cards played after Flex in a given turn and try to calculate how much extra damage was done because of Flex and then use that to calculate the reward attributed to Flex. The biggest problem with this technique was that it was not scalable since each card with a buff required a custom reward function.
The new technique is to attribute reward values only for winning or losing the game. There is no intermediate reward calculated for each individual turn. In contrast to the previously used technique, this approach is easily scalable. At the same time, it is also a more intuitive and logical approach since a reinforcement learning agent should only be rewarded for achieving the goal. With the introduction of intermediary reward, we introduce bias into the agent depending on what the human programming the agent thinks is the correct approach.
The other important issue for the week was to focus on figuring out why we see constant drops in the reward value in the training graphs. An example of this can be seen below:
As you can see from this image, there are consistent and periodic drops in the reward values. This graph shows rolling averages of 20 games. This means that the drop is not limited to a single game but a series of games. We see that as the number of iterations increase, the distance between drops is going down. This might be a clue indicating that as the AI’s age might have something to do with the drops. However, it is still a mystery as to why this is happening.
We initially assumed that the natural culprit for the causing the drops would be Q-model switches. However, there is no logical reason to believe that the Q-model switch is in fact causing this. Not to mention, there are a significantly higher number of drops than Q-model switches. For the graph seen above, there have only been 5 Q-model switches whereas the number of drops is 21.
The other natural culprit for this can be the data collector or the data writer. Perhaps there is nothing wrong with the algorithm instead there is something wrong with the collection and interpretation of this data. After all, we know that the winrate is true because we have tested the trained AI agent multiple times and it is clear that it has learned a lot about the game.
Going into the following week, we will still be looking closely at the AI training to figure this out. We theorize that solving this problem may hold the key to further improve our winrate.
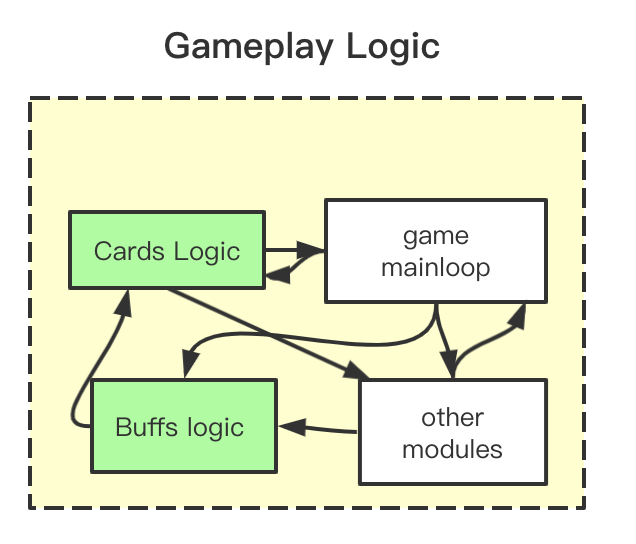
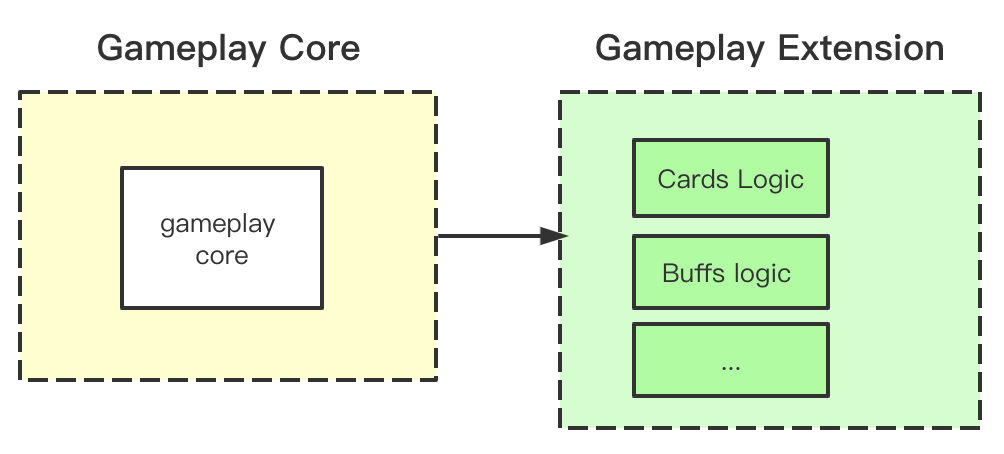
Gameplay Rebuilding
An important focus of this week has also been to include the remaining portion of the Slay the Spire game that we had initially planned. Right now, there are many Ironclad cards and buffs that are not a part of our game. With the AI working well, we are heading over to include this remaining part in the game.
Motivations
Extendibility: We want to add more cards, more buffs, more mechanisms into our game to let the AI play. We need to make some changes on the current game code in order to restructure it so that we can add new features easily.
Generalize our method: We want to allow the user to customize the game not only on the game data level, but also deep into the gameplay logic level. This, however, should still let AI play the game.
How it works
Previously: In the older structure, logic of specific cards was embedded in the gameplay logic. This is convenient. But when we try to add new buffs and new card mechanisms, we need to look at the intertwined gameplay modules to figure out how to make these changes. An illustration of this can be found below:
Current: Now there are two parts in our gameplay. One is gameplay core, which provides the basic logic and game mainloop. The other one is gameplay extension, which includes the customized gameplay logic.
The gameplay core provides API , and gameplay extensions use these API. During the runtime, it will dynamically load the gameplay extension code.
To add new mechanism(buffs/card effect), we just simply follow the API, and don’t need change the gameplay core or worry about the details how they are implemented. Below is an illustration of how this would work:
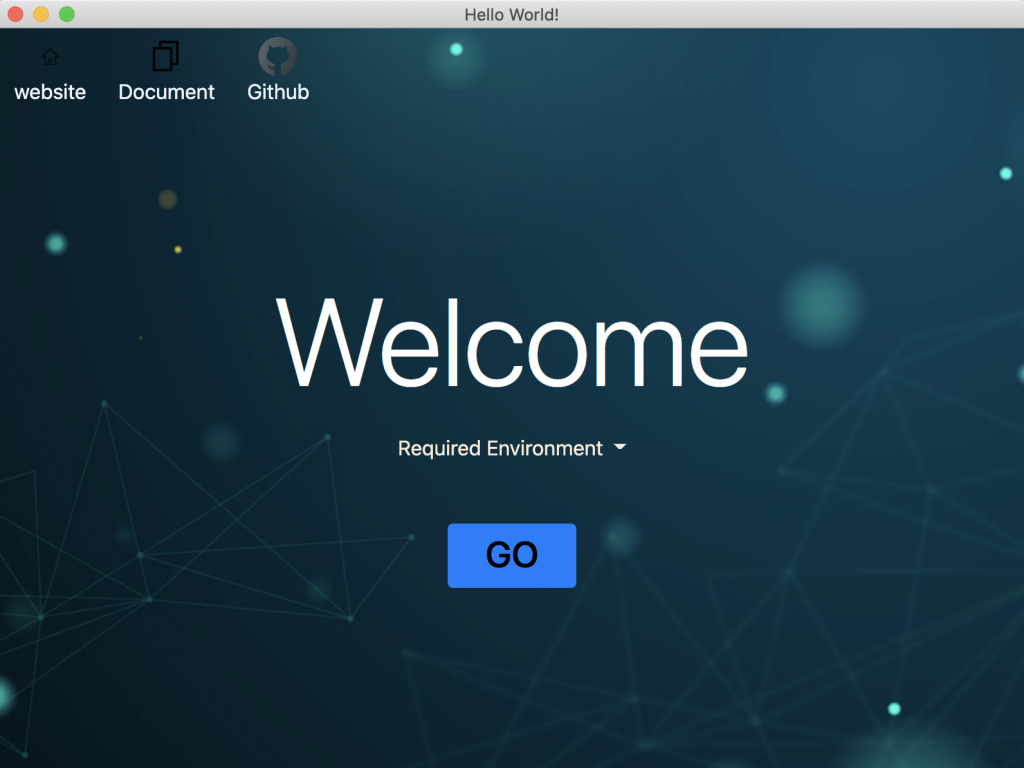
One App for All
We plan to develop one app for everything, including AI Module, Unity frontend, python gameplay, card/deck editing, data visualization, etc. A screenshot of our first prototype is shown below:
Motivation
Accessible to designers: After halves, we started to think about how to serve designers. We need a user friendly GUI to let designers use all the tools we provide.
Organize our tools chain: We have many tools built on different platforms using different techniques. We even plan to build more tools. This is a good chance for us to bring everything together in an organized and set a precedent for what comes next.
Consideration of Different Approaches
System Built in Unity:
Pros: Our game’s GUI is developed in Unity, and we are familiar with Unity.
Cons: Unity’s UI system is not designed for a generalized desktop GUI. This would be a big problem when we try to build complex UI such as data visualization.
Browser Based : HTML, CSS, JavaScript
Pros: Easy to use and easy to develop. Web techniques are convenient and have many libraries and frameworks.
Cons: Browsers usually don’t support manipulating local files and start executables, which is very important for us.
Electron (Finally picked this)
We ended up choosing electron because of two main reasons:
Uses web standards: Developing a desktop app is basically the same as writing a website in electron. It uses html, javascript and css, and we are already familiar with these techniques.
Highlevel, lightweight: Because ofhtml and javascript, developing an app is much easier than other techniques such as windows naive API, Qt, etc.
An Introduction to Electron
Electron is a framework for creating native applications with web technologies like JavaScript, HTML, and CSS. It takes care of the hard parts so we can focus on the core of our application. Here is a link to its website – https://www.electronjs.org/
We want to build cross-platform desktop apps for designers to use. Functions like create and edit cards, deck building, running training scripts, and view replay in unity can be activated from a central control panel created by Electron. Below is a screenshot of what a homescreen containing this would look like:
Using Electron to Edit Cards
This part of the application was implemented this week. The motivation for doing this is to make it easier for designers to modify cards. We do not want them to open json files and edit values there since this may be a little daunting for those who are not familiar with json files. Instead, now the user can edit a card file and save it using our tool.
Insights from Meetings with Game Design Faculty
This week we met with Jessica Hammer and Dave Culyba to talk about the different things a game designer would be looking for in our tool. Here is some interesting insights that we got:
What are the things that an AI playtester can give you but a human playtester cannot? Try to incorporate as many of these things in your tool as possible. There are many things that an AI can quantify but a human cannot.
Focus on outliers. Highlight and save game trajectories where something out of the ordinary happens. Try to figure out how these trajectories came to be.
How to average reward values of cards change over iterations during training. This might give important information about how the AI is learning.
There must be a level of certainty about whether the AI results are true and trustworthy. Is the AI learning similar gameplay as compared to a human. Getting in touch with the Slay the Spire team can help us with this.
Along with these insights, we also got a few suggestions of things we should try and do which we are currently looking into:
Prepare a list of different statistical values/trends that can be generated using AI Playtesting. Do this as a brainstorming session.
Write out / role play the conversation a designer would have while looking at our tool. What would go through their heads when interacting with this tool? What are the different questions they would be trying to answer with our tool?
Despite this being the week with halves, we managed to get a lot of things done in a variety of areas. The project is looking more and more promising as each week passes. We are excited about what the future holds in store for us!
This was the week before halves and all of us spent a considerable amount of effort in preparing for it. However, we also made some considerable progress in both the AI training as well as the Unity visualizer. Most importantly, we managed to improve the AI’s winrate to ~60% which is significantly higher than the previous week’s ~13%. This came as a result of several bug fixes, addition of a new input feature and a modification while calculating q-target values. As part of the Unity visualizer, we can now integrate a trained AI with it to see how the AI predict’s expected rewards from playing cards in a turn. Along with this, we also implemented a state editor tool which allows us to create our own states within Unity that can be very useful in seeing the AI’s reactions in particular states. Lets go over each of these one by one.
AI Algorithm Updates
The list of things we tried and tested this week are as follows:
Addition of ‘Remaining Damage for Boss Mode Change’ as an Input Feature
The Guadian (boss in our implementation) in Slay the Spire has two distinct modes offensive and defensive. It also has specific intents for each phase. When the Guardian is in offensive mode, it generally deals a higher damage than when it is in defensive mode. The switch from offensive to defensive modes happens as a result of damage from the player and generally this is a tool for the player to force the boss into the stance which is favorable to the player.
This feature had been left out in our initial models which could have been one of the contributing factors to why the AI was performing poorly. Luckily our faculty instructor Mike Christel pointed this out during one of our faculty meetings where he saw the state space and found this value missing. Addition of this feature to our state space did not immediately result in improved results, however we believe that it was a contributing factor that propelled the winrate higher.
Action Masking
An approach we focused on this week came as a suggestion from a conversation with a PhD student on main campus James Cunningham. As another strategy to teach the agent about unplayable cards quickly, we decided not only to adjust the q-value of the card that was played but also to adjust the q-values of all the unplayable cards. How do we calculate the target q-values for unplayable cards? Well, since these cards are unplayable we should give them the same negative reward that we give the agent when it tried to play an unplayable card.
This means that there would be a negative reward associated with all unplayable cards while constructing the q-target vector only the playable cards could have positive values. Since the largest negative reward is for trying to play unplayable cards and losing, the agent is motivated to quickly learn which cards are unplayable. Earlier, we saw that the agent generally took ~1000-2000 games to learn to not play unplayable cards. With action masking implemented, it now takes ~200-300 to learn to not play unplayable cards. This is a big leap and it gives the agent more time to learn and explore the actual game.
Testing different values for Number of Iterations before Q-models switch
Last week we introduced the idea of using incremental gamma values along with 2 q-models for our training process. This week we tried an experiment to check what is a good number of iterations for the q-train model to train for before we make the q-model switch.
We tested with 10,000 iterations before switching and this resulted in a very poor winrate of ~10%. This is significantly lower than the ~55% winrate that we got with 100,000+ iterations. We also tested with 500,000 iterations and this also gave us a winrate of ~60% implying that increasing the number of iterations too much does not improve the winrate considerably.
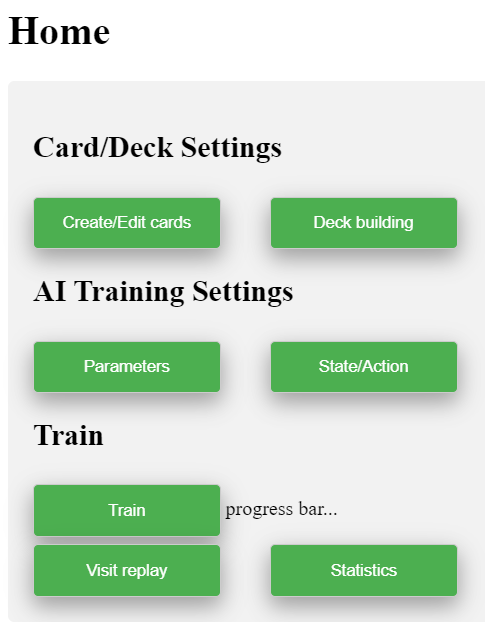
Ideation towards our Playable Prototype
One of our deliverables for the project is to create a playable prototype that is accessible for designers, can run AI trainings and can also provide an interface to load up the Unity visualizer.
Our current plan is to have a home page which is similar to a central hub that controls everything else. This would contain paths to the following:
Create & edit cardspage: enable designers to create and edit cards.
Deck building page: configure what and how many cards to include in a version of the deck.
Modify AI training parameters page: set hyperparameters like gamma (discounting factor when calculating rewards/q-value), epsilon (whether choose random action), number of iterations, etc.
Modify state/action space page: modify the state space (player hp, boss hp, cards on hands…) and action space (possible cards) for the AI training process
Train button: run the training process along with a progress bar to indicate how much of training is complete.
Unity game visualizer: for manual playtesting and visualizing AI decision making after AI training is complete.
Statistics Sheets: after training is complete, user can see an excel sheet that give insights about training performance and AI decision making with respect to the cards in deck.
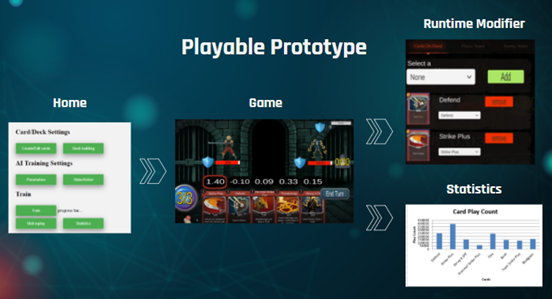
Here is a screenshot of one of the slides for our halves presentation that shows these different components in actions:
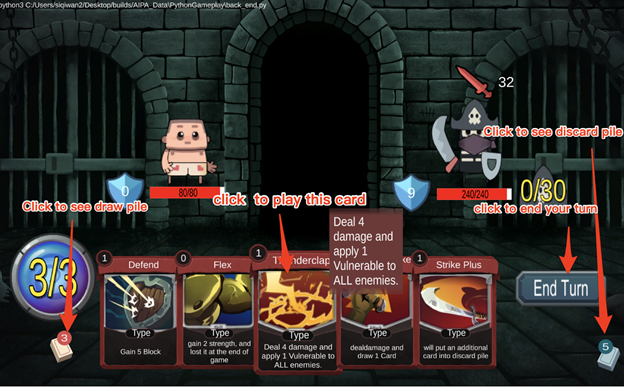
Integration of AI into Unity GUI
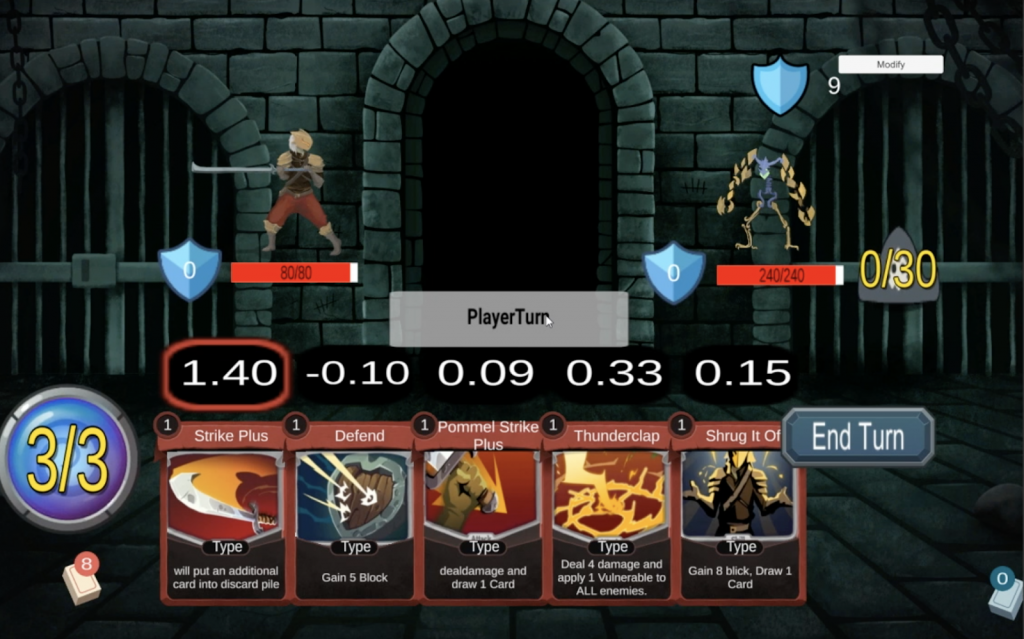
An important milestone for our project was the integration of AI into the Unity GUI. This is a big thing for us because now we can finally visualize how the AI sees the cards in any particular state. Below is a screenshot of how this looks right now:
The values seen above the cards in the picture above are the expected rewards for playing each card as predicted by the AI. The highest value (in the example above this is Strike Plus) is highlighted to show that this is the card recommended by the AI. If the AI was playing the game, it would always play the highlighted card.
Backend integration
The system currently works only after the AI has been trained completely. Backend provides the current gamestate to the AI Module, and then gets rewards for each card. Because all projects(AI/Gameplay/Unity GUI) share the same definition of ‘game state’, this part is simple.
Frontend integration
As we discussed in previous weeks, frontend is designed to work in a ‘data-driven’ render mode. It works like a browser; backend gives markups of game state and game event to frontend, and frontend parses the information to render the GUI.
So in the frontend, showing reward values is just adding another type of markup. Our markup system and existing rendering workflow is designed to be very flexible with these kind of changes.
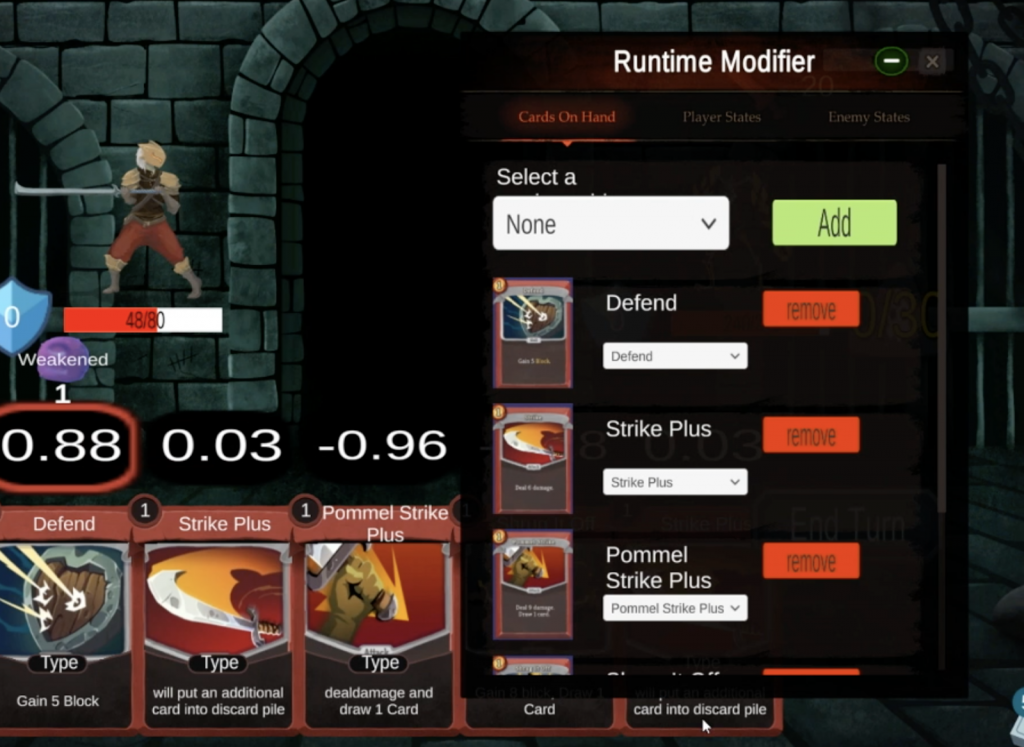
Runtime Game State Modifier
This week we also implemented a runtime game state modifier to allow us modify game data when the game is running. This serves as a tool for programmers to create test cases to test the AI’s decision making. It can also be used by designers to craft scenarios in order to see how the AI interprets certain cards. Here is a screenshot of how this looks right now:
Runtime modifier program design
When we consider a runtime modifier, we mainly consider 3 things;
Flexible/Self-adaptive: We need to modify the gamestate, which keeps changing throughout the development process. The ideal case is this modifier adapts with newer versions of gamestates and we don’t need to rewrite any part of the code.
Instant feedback: This is the reason why we want to integrate this in runtime. Because gamestate modifications may happen with a very high frequency (especially when you have a value slider, it will change multiples time in one second). If it reloads the whole game ,which is more than 30 seconds, it would be a very frustrating experience.
Undo/redo support: This is a basic requirement of any effective and efficient tool!
Approach 1- Incremental modification:
A possible design for this is that it works like a version control software like git. We use increments to present each modification and apply these increments to the gamestate.
Pros:
Instant feedback and very efficient. We can even let modifications happen immediately in the local GUI and then let the backend validate.
Cons:
Not flexible: we need to write codes for every kind of modification, add/remove/change for all types of data in the gamestate.
Undo/redo problem: it is doable, but will take a lot of work. Whenever we write an ‘Apply()’ function, we also need to write a ‘Revert()’ function.
Approach 2-Snapshot-style modification
This is the design we settled on. Whenever modifications happen, it will trigger Frontend, take a snapshot of the current gamestate, and then send back to the python backend to overwrite the current gamestate with the snapshot.
Pros:
Self-adaptive: We already had gamestate markups encoded by backend, we just modify the markup and send it back to python. Because all encode/decode happens in python, which is a dynamic language. Hence, all changes can be self-adaptive.
Easy undo/redo support: We will do this in future. But if it just saves the snapshots in buffer, this will not be too hard.
Cons:
Instant feedback: this might be a problem in other games, when you want to take a snapshot of the whole game. For now, a snapshot of our game is less than 4000 Bytes, so it is acceptable.
Parallel Frontend-Backend Communication
In order to better support the runtime modifier, we modified our frontend-backend communication to go from ordered single sequence into multiple parallel sequences.
Previous ordered single sequence:
In the early stage, the scenario is very simple. GUI sends user input as a request, and python sends markups or system errors as response. The request/response mainloop just follows the gameplay: playerturn, playcard, enemyturn and enemy intent.
Current parallel multiple sequence:
Now GUI sends more requests than just the player input. It also requests database queries and runtime modifications. In the single sequence model, if the mainloop expects a player input, but receive a database query, it’s very difficult to handle.
Now the backend has independent mainloops for gameplay, database queries and runtime modifications. We largely refactored the backend and gameplay code to make this change.
Halves Presentation
All the above mention progress aside, we were also working on our halves presentation. This is going to be a good opportunity for us to show the ETC faculty about what we have been doing and our journey to achieve the results that we have.
Our presentation is on Monday (19-Oct-20) at 4pm and we are looking forward to it. As it turns out, we will be the first team doing halves presentation this semester. We hope to do a good job!
This week saw more work along similar lines as the last week. One major improvement for the AI came as a result of making it simpler for our designer to run training. A major algorithm update was also done which helped us improve training results. A whole set of new cards was added to the game for which we had to add some additional reward functions. Training data is now recorded better with a lot of important statistical information and charts being saved in an excel file. On the Unity front, we finally finished the GUI prototype of the boss fight based in Unity. We sent it out to our faculty instructors Mike Christel and Scott Stevens to test. Finally, we also began preparation for halves which is due on 19th October.
AI Updates
The updates made to the AI can be broken down into the following three parts:
Flexible State and Action Spaces
Flexible state and action spaces implies that the AI Agent script no longer needs explicit instructions about the state and action space. Instead it picks up this information from JSON files just like other parts of our app.
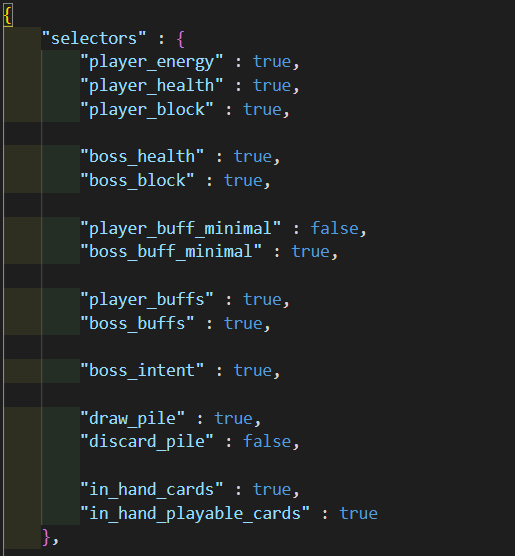
State Space : The state space is constructed by looking at the state space selector file. This is a JSON file that has a bool value attributed with various portions of the state space (player buffs, boss intent, in hand cards, etc.). Before starting training, you can now directly modify this file to choose what should and should not be included in the state space for AI training. The below is what this looks like right now:
Action Space : Constructing the action space involved looking into the database module and getting information about the current deck configuration. The action space is then constructed by adding a neuron for each card which has a non-zero count in the deck. There is no input required to directly modify the action space.
The reason for adding this feature is to make it much simpler for a designer to run training. Now the designer simply needs to choose cards to add to their deck and update the state space for including states that they want in the state space. This format is also great to integrate with a GUI system that can make doing the above as simple as filling out a form containing different elements of the game state.
We needed a system like this to make the AI training more accessible to our designer. There are still many experiments that need to be run and many of them involve modifying the deck and updating the state/action space.
AI Algorithm Updates
Another important task this week was the modifications made to the A-Learning algorithm. Last week, the major change we made which resulted in stable learning was updating the discounting factor (gamma) to zero when calculating a state’s expected reward. This essentially meant that expected reward of a state is equal to only the immediate reward received from the current state. The reason learning becomes stable by implementing this is that the q-target becomes fixed. Earlier (with gamma > 0), the q-target value for the same state could change as a result of updates made to the q-learning model. But if the discounting factor is made zero, the q-target becomes exactly equal to the immediate reward (the reward is stochastic in our environment as a result of the game’s randomness).
This was what we did last week. This week, we wanted to increase gamma to be greater than zero while still ensuring that training remains stable. We did this by adding another model to the AI Agent script. Thus essentially now we have two models. The setting is such that one model is used only for prediction and the other model is used only for training. When the model being trained has gone through enough iterations, the model making predictions is deleted an the trained model takes it place. A fresh model is instantiated to be the new training model. A shorter version of the same is outlined below.
Instantiate two models Q-Train and Q-Predict
For number of games:
Q-Train is initially trained while Q-Predict is used to make predictions (the first Q-Predict model will only make random predictions)
If Q-Train has gone through enough iterations:
Q-Predict = Q-Train
Q-Train = new model
Essentially, the purpose this serves is that it keeps the q-targets stationary for a length of time while the Q-Train model is being trained. This stabilizes the training of the Q-Train model. Once the Q-Train model is ‘experienced enough’, it can start making predictions.
Another thing this enables us to do is to make gamma > 0. But this is not done immediately. Instead, the starting gamma is 0 but every time the Q-model is switched, the gamma is made a little higher. Hence, the discounting factor starts off with 0 and increases by 0.2 every time the Q-model makes a switch. This way, every fresh Q-Train model, attributes a little higher weight to the future reward as well as the expected reward.
Implementing the above algorithm update has increase the win rate from 0.4% to 7.87%. Although the win rate is still far from good, the AI is definitely performing better and has started winning in a setting that is challenging even for a human (player hp : 75, boss hp : 240). This is the biggest breakthrough at AI training that we have had in a while. As a result, it gives us hope that we are on the right path for making progress towards the goal.
Reward Function Updates
The last piece of AI updates involves updates made to the reward function. There were bugs in the reward function that resulted in unfairly high rewards to the damage dealing cards. This has been modified and rewards to the buff cards and block cards has been buffed a little. Using a complex reward function like this is something that we want to move away from in the long run. The idea behind reinforcement learning is to train the AI as much as possible with only rewards for achieving goals. What we have ended up doing is giving a lot of intermediary goals to push the AI towards achieving the desired goal. The reason is simply that we have not had much success with rewards only for the final goal and hence we introduced intermediary rewards. However, this is something we would like to change.
AI Training Statistics
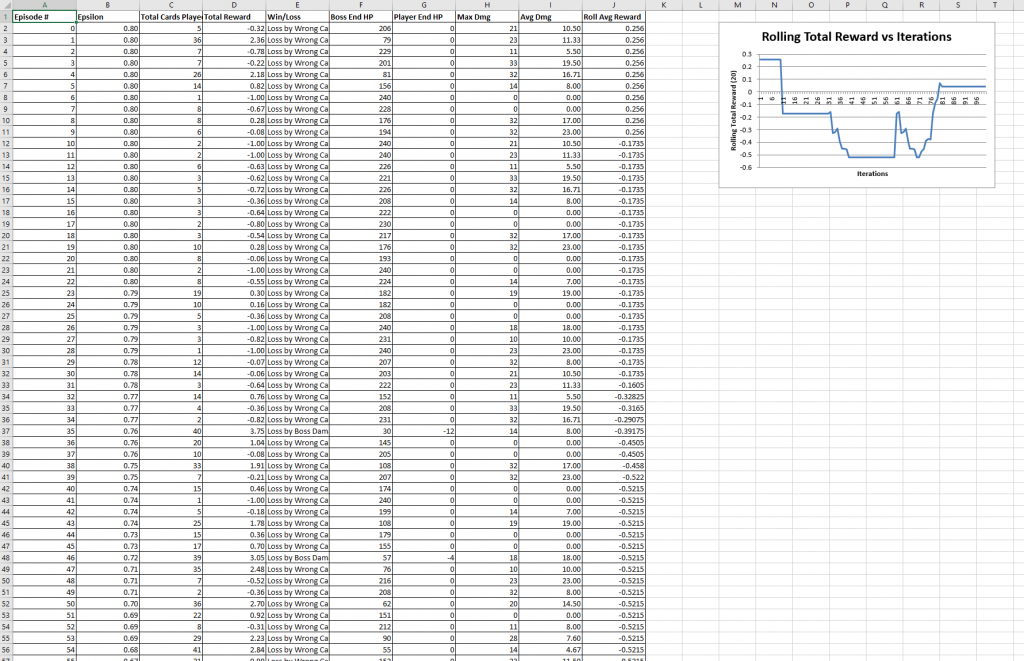
Another significant improvement made in the previous week is the addition of comprehensive AI training statistics as a part of the AI generated data. To do this we had to add many new scripts that deal solely with collecting, processing and writing AI training data.
The generated statistics file is now a .xlsx file which includes two worksheets.
Training Data : This worksheet provides episode details of each game played by the AI. This includes the following information for each episode:
Episode Number
Epsilon value for that episode
Total cards played in the game (each episode is one game)
Total reward for this episode
Win/Loss
HP of the Boss at the end of the game
HP of the Player at the end of the game
Max Damage done in any turn of the game
Average damage done in the turns of the game
Episode indexes when model was switched
A graph showing a rolling average of total episode reward (average over 20 games including the current and following 19)
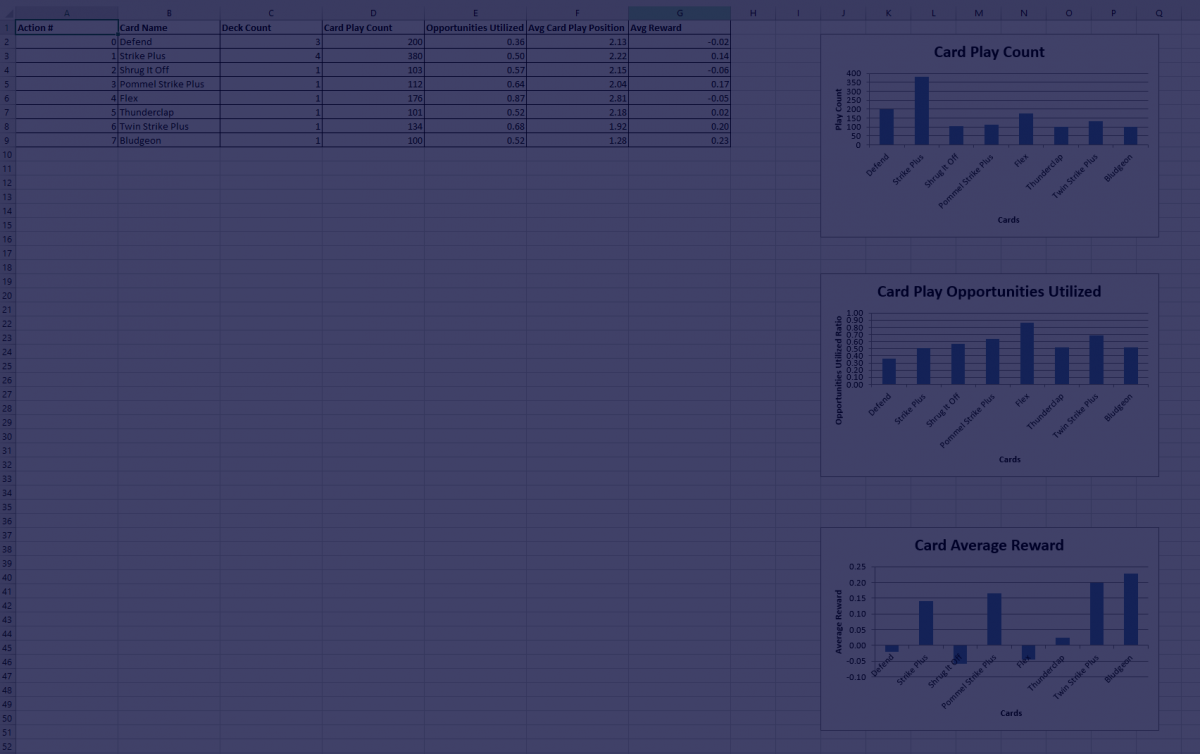
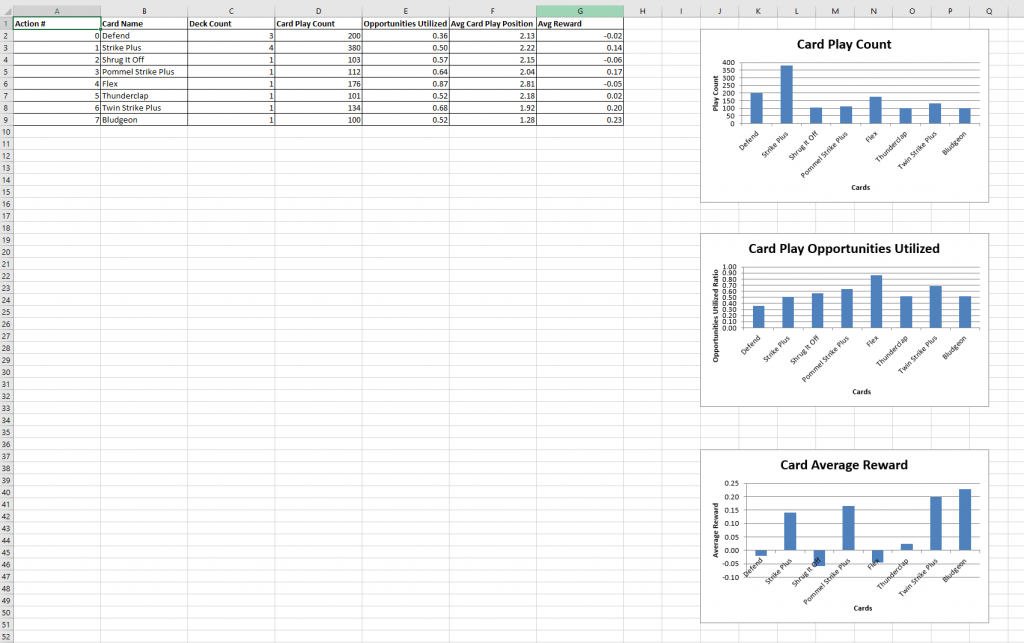
Card Statistics : This worksheet provides insights into the performance of each card in all games played during training. This includes the following information for each card in the deck:
Action number (this is the number of the action neuron representing the action of playing this card)
Card name
Count of this card in the deck
Card play count : times this card was played in all games of training
Opportunities of playing a card utilized. It is a ratio of how many times a card was played divided the number of times it was available
Average card play position. At what step in the turn was this card played on average. For example, if a card was always played between the first in all turns, its average card play position would be 1.
Average reward obtained by playing this card.
Graphs of Card Play Count, Card Play Opportunities Utilized and Card Average Reward
Below are screenshots of these excel sheets and what they look like right now:
Training DataWorksheet
Card Statistics Worksheet
These statistics have already given us some great insights into what is happening during training and how the AI is thinking while playing cards. Although this is not an exhaustive list of the statistics we wish to provide the game designer, it is a start towards achieving the greater of training the AI, i.e helping the designer. As the AI training improves, these statistics may prove to be quite valuable to the game designer in making game design decisions.
Python Integration Into Unity Build
As a result of the game backend being in python and rendering of graphics in Unity, in the past we had two separate applications running at the same time. We figured out how Unity and Python communicate, however, this only works during development. Once we build the project and deliver it to players, it becomes more complicated because unity manages its own resources and builds most of them into binaries or machine code. To figure out how to do this, we analyzed some of the various options available to us.
Option 1 – Remote Server:
Python code will not run in the build, instead it will run on a remote server. This is doable to some extent, because we use sockets to communicate between Unity and Python. And our architecture is very similar to a frontend-backend model.
Pros:
Needs very little work, just run python on another computer as a server when playtesting.
More convenient to collect data from playtesters in the background.
Cons:
The build is not self-contained. Always needs remote server to work.
Option 2 – Integrate Python Executable into Build
Use tools like pyinstaller (https://www.pyinstaller.org/) to pack python code into a .exe, and then start that .exe when Unity application starts.
Pros:
The build is 100% standalone.
Cons:
Build fails in our project now, using pyinstaller. We need time to make sure the build process works.
We wrote our database module in Python. We don’t want to put data (images, configurations) into the python executable directory.
Option 3 – Interpret raw python code files within build
We make a unity build first, and then include python code directories into Unity build. During runtime, the Unity application finds the Python interpreter to execute the code.
Pros:
The process is 100% transparent. We have full control of the directory, resources and data in the build.
Cons:
Not 100% standalone for now. There is a dependency on the python environment in the user’s computer.
Final Decision : (3) Include raw python code files within Build
We don’t want to maintain a server which eliminates option 1.
Option 2 would be ideal if it works, however, pyinstaller is a big unknown to us and we don’t know how much time we need to fix it
We made option 3 work, and in the future we plan to install the required environment for users before starting the application.
Playable GUI Version of Game
In week 4, we designed and implemented the architecture of combining gameplay in python and GUI in Unity.
In week 5, we developed the animation workflow from python to unity.
Finally during week 6, having the existing foundation, we made our first playable version! Below is screenshot of how it looks:
A lot of work went into making this run. Here are some key highlights of the steps we needed to take:
Enriching the C#/Python protocol
Previously, our protocol only supported requests of user input and response of markup files for unity to render.
Now our protocol supports multiple types like system error, game life cycle update, etc. Additionally, it is also extensible for new types.
Resources (card image/tooltip text) management from python database to unity
Now we can configure the images, descriptions of cards in the database (python). Unity will read this data according to the configuration!
Information display
Card information, deck information, description and images of every card, states and information of player and enemies, are all showed to the player.
Comprehensive and robust Main gameplay process
From connecting to backend, start game, player turn, enemy turn, loss/win and replay. We now have a complete process for playing, recording and replaying the game
Input validation
The previous version allowed the player to freely click all buttons and send requests to the backend, but these inputs were not validated in the backend. For example, validating if the card played is on your hand or if you have sufficient energy to play it. We recently added input validation to make the application robust.
Addition of New Cards
In the last week, we added several new cards to the deck. These have been integrated such that they work in the game as well as for training AI. The new cards include a lot of the ‘plus’ version of our existing cards as well as some newer cards. A list of the new cards is below:
Plus versions of existing cards:
Anger Plus
Body Slam Plus
Clothesline Plus
Defend Plus
Disarm Plus
Flex Plus
Heavy Blade Plus
Pommel Strike Plus
Sword Boomerang Plus
Shrug It Off Plus
Iron Wave Plus
The new cards that have been added are:
Bash / Bash Plus
Bludgeon / Bludgeon Plus
Thunderclap / Thunderclap Plus
Twin Strike / Twin Strike Plus
Uppercut / Uppercut Plus
Adding these new cards inches our implementation closer to the real version of Slay the Spire (it is still quite different). It also gives our designer the ability of modify the deck with many different cards and running training with various different deck versions.
All in all, we made a lot of significant progress this week. We are excited to show our work at halves and for the future of our project!